Having got as far as an Arduino MIDI Button Bank Selector I went off an ordered some cheap 8-way button pcbs so I can start to experiment with a voice selector too. As I think I mentioned before, I’d really like a set of buttons like you’d find on a real synth 🙂
This is the first go at getting something working on a solderless breadboard.
Warning! I strongly recommend using old or second hand equipment for your experiments. I am not responsible for any damage to expensive instruments!
These are the key Arduino tutorials for the main concepts used in this project:
If you are new to Arduino, see the Getting Started pages.
Parts list
- Arduino Uno or Nano
- For USB MIDI: Arduino compatible Pro Micro (or other ATmega32U4 board)
- 5 banks of 8 buttons (see photos – I searched for “matrix 8 keypad” using online auction or Chinese marketplace sites)
- For serial MIDI: MIDI interface
- Breadboard and jumper wires
- A synth module to control. I’m using my MiniDexed.
The Circuit
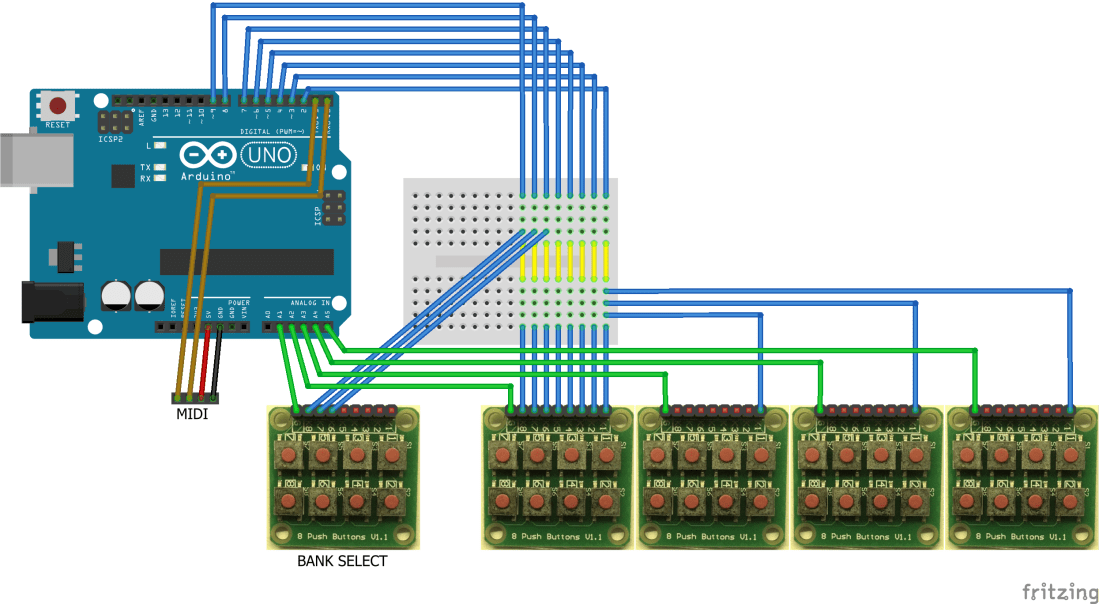
The diagram shows five banks of 8 switches plugged into an Arduino Uno. They are wired in a “matrix” format – each of the eight switches is connected to D2 to D9 on the Arduino; then each module has its own “common” IO pin – I’m using A1 to A5 in digital pin mode. I’ve not shown every one of the eight wires to every module to keep the diagram relatively clear, but all eight wires must be connected from each module to D2 to D9.
The basic operation is that D2 to D9 are configured for INPUT_PULLUP, but A1 to A5 are configured for digital OUTPUTs and all set HIGH. Then each of A1 to A5 is pulled low in turn and then if any of the buttons are pressed on that module, then the corresponding D2 to D9 pin will read LOW. But we don’t really need to think about that as it is all handled by the Arduino Keypad library.

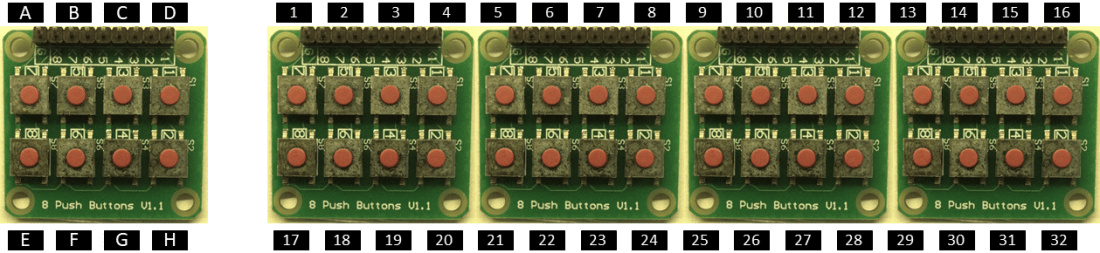
One thing we do need to note though is how the buttons are wired to the header pins. The order is as follows (in the orientation as shown above):
- Top Row: K7-K5-K3-K1
- Bottom Row: K8-K6-K4-K2
For serial MIDI output, a MIDI module needs to be connected to TX, 5V and GND.
If USB MIDI is required, then an Arduino with native USB is required – i.e. one based on an ATmega32U4 such as a Leonardo or a Sparkfun Pro Micro.

The Code
I’m using the Arduino Keypad library, which can be installed via the Arduino Library Manager in the usual way. It is worth just testing the wiring first using one of the example sketches. I’ve used the “customKeypad” sketch using the following key matrix.
#include <Keypad.h>

const byte ROWS = 5;
const byte COLS = 8;
char hexaKeys[ROWS][COLS] = {
{'D','H','C','G','B','F','A','E'},
{ 4, 20, 3, 19, 2, 18, 1, 17},
{ 8, 24, 7, 23, 6, 22, 5, 21},
{12, 28, 11, 27, 10, 26, 9, 25},
{16, 32, 15, 31, 14, 30, 13, 29},
};
byte rowPins[ROWS] = {A1, A2, A3, A4, A5};
byte colPins[COLS] = {2,3,4,5,6,7,8,9};

Keypad customKeypad = Keypad( makeKeymap(hexaKeys), rowPins, colPins, ROWS, COLS);

void setup(){
  Serial.begin(9600);
}

void loop(){
  char customKey = customKeypad.getKey();
  if (customKey){
    Serial.println(customKey, DEC);
  }
}
The rather odd ordering is to keep the wiring simple. This matches the orientation of the keypad modules as shown in the diagram (and photos).
To map this over to MIDI messages, I’ve allocated the numbers 1 to 40 to the keys so that numbers 1 to 16 form a “top row”; 17 to 32 form a “bottom row”‘ and 33 to 40 are eight “bank selection” switches.
The main loop is relatively simple, as the Keypad library is doing most of the work. Note that key is 1-indexed and that values greater than 32 are treated as bank selections, not voice selections.
void loop() {
  char key = kp.getKey();
    if (key) {
      if (key <= NUM_VOICES) {
      // Voice/Patch change
      midiPatchChange (key - 1);
    } else if (key <= (NUM_VOICES+NUM_BANKS)) {
      // Bank select
      midiBankSelect(key - NUM_VOICES - 1);
    }
  }
}
Closing Thoughts
If I had a 3D printer, I’d be printing out a case and set of buttons that matches the styling of a DX synth with physical buttons! But I don’t, so I’ll have to make do for now…
But this is absolutely shouting “make into a standalone module” to me, and if I used a Pro Micro, I could make it fully USB and self-contained for plugging into my MiniDexed! If I was feeling more adventurous I’d even build in the MiniDexed display and rotary encoder to make a fully “DX7 in a box” complete with all patch buttons.
Of course, as this is just sending standard MIDI BANKSEL and program change messages, you can mirror the voice selection configuration of any of your favourite synths! And if you need more buttons, there are still more IO pins that could be used to index into additional modules. As shown, with an Uno, D10-D13 and A0 are still free, giving the option of five more modules. If you use a different Arduino board you might even have more.
Kevin

Link to a supplier page for the button modules?
LikeLiked by 1 person
There isn’t really a single supplier, but I added a note that searching for “matrix 8 keypad” seems to find plenty in the usual places 🙂 To be honest, any similar module should do the trick.
LikeLike
hy kevin how to add midi in out for cede and gm midi synth like mt32
LikeLike
This code is using a standard off-the-shelf serial MIDI (din) module connected to the Arduino UART (RX/TX). In principle any of the off the shelf or DIY MIDI interfaces ought to work. Is that the kind of thing you mean? Start here and see if anything looks relevant: https://diyelectromusic.wordpress.com/2020/08/12/arduino-midi-interfaces/
I have a range of different projects doing Program Change messages which might work as alternatives, depending on exactly what you’d like to do. See: https://diyelectromusic.wordpress.com/tag/program-change/
Kevin
LikeLike
i want to combine with midi filter for control gm midi synth
LikeLike
Hi Kevin. Did you ever get that 3D printer?
My fingers are itching too to make this indeed into a self-contained device with nice colored buttons for the patches and voices.
LikeLike
Haha – no I didn’t! But if you do have a try be sure to send me a photo! 🙂
LikeLike
Hy Kevin how to make work 8 MIDI bank
8 MIDI button select preset for quick select live performance please
LikeLike
The specifics will be dependent on your synth as things like how a BANKSEL MIDI message is interpreted is synth dependant, but the general principles of how to send bank messages is here: https://diyelectromusic.wordpress.com/2022/05/05/arduino-midi-button-bank-select/
Good luck!
Kevin
LikeLike
is this suitable for functioning for general midi sound module mt32/vs1053 gm synth and how for some buttons to give messages midi solo/mute chanel 10 drum & chanel 2 bass on gm sound module vs1053/mt32 because I want to combine mt32 and vs2053 gm synth simultaneously mt32 sound chanel 2 bass &drum chanel 10 y custom & dan vs 1053 chanel other instruments
LikeLike
This won’t do that directly, but there is code across some of the other posts I’ve already mentioned in my replies that should be able to be combined to largely do what you want I think? But what you’re asking is getting quite specific to your setup so you will have to do some tailoring of the code and projects to exactly what you need.
Kevin
LikeLike
Hy Kevin i need 8 button select button preset for stand allone gm sound module ,i used gm soundfond mt32 Pi for quick live performances can you make it code and scetch please
LikeLike
In that case the basics of what you need are probably described here: https://diyelectromusic.wordpress.com/2020/06/05/midi-patch-button/
This only has a single button, but having 8 buttons on 8 IO pins is definitely possible with some cut and pasting code 🙂
Kevin
LikeLike
Hy Kevin i have dream Sam 2695 gm synthesizer board https://hackaday.io/project/6378-dream-sam2695-breakout-board how to make controll for patch changer button voice select like your project help me please
LikeLike
I’m pretty sure the Dream device is General MIDI? If so, then hooking up MIDI to it means it should just work with Program Change messages…?
Kevin
LikeLiked by 1 person
Hy Kevin i have dream Sam 2695 gm synthesizer board https://hackaday.io/project/6378-dream-sam2695-breakout-board how to make controll for patch changer button voice select like your project help me please
LikeLike