One thing I’ve wanted to try is wireless MIDI. I know you can get MIDI over Bluetooth (there are some rather neat commercial “wireless 5-pin MIDI” adaptors you can buy) and I believe people have used MIDI over Wi-Fi by using ipMIDI (“MIDI over Internet Protocol”).
But I’ve had some cheap nrf24L01 radios for a while and so far have not done anything with them yet, so I thought I’d try to use them as a MIDI link.
As with my I2C experiments, this is a very early (read draft, use-at-your-own-risk, very likely to change) implementation of an RF24 transport for the Arduino MIDI Library.
- In part 2 I build a simple carrier board and experiment with “multicast” functionality.
Warning! I strongly recommend using old or second hand equipment for your experiments. I am not responsible for any damage to expensive instruments!
These are the key Arduino tutorials for the main concepts used in this project:
- nRF24L01 Interfacing with Arduino
- How nRF24L01+ Wireless Module works and Interface with Arduino
- NRF24L01 2.4GHz Radio/Wireless Transceiver Howto
- Arduino RF24 Library Examples
If you are new to Arduino, see the Getting Started pages.
Parts list
- 2x Arduino Uno, Nano, or similar
- 2x NRF24L01 radio modules
- Optional: 8 ohm speaker or old headphone speaker
- Optional: 1x 220Ω resistor
- Optional: Arduino MIDI Interface
- Breadboard and jumper wires
The Circuit
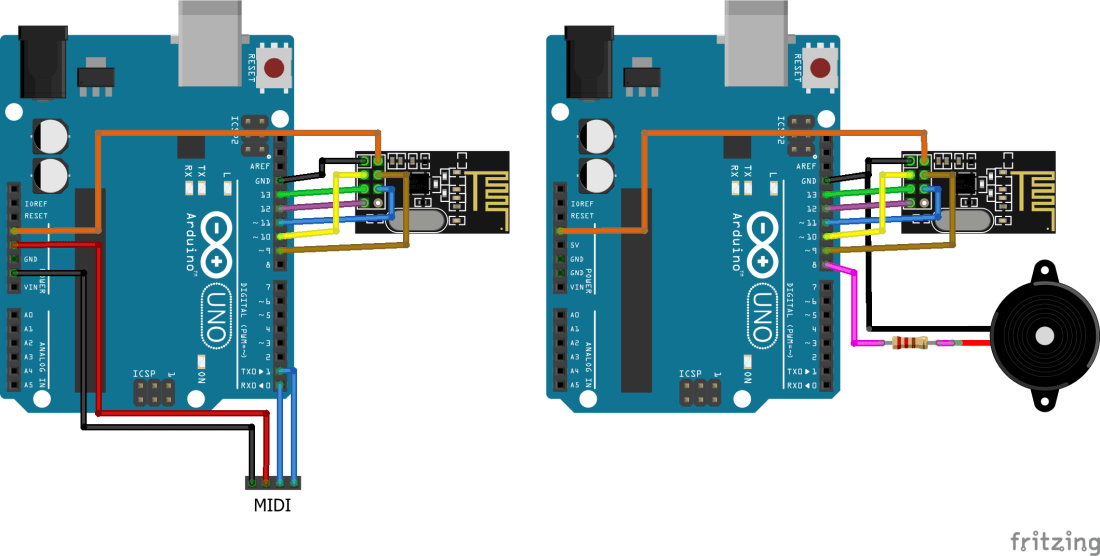
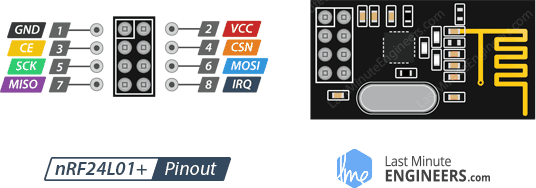
A typical nRF24L01 module is shown above and below. It needs the three SPI connections to the hardware SPI pins, two pins for CE and CSN, and GND and 3V3 for power. Here is a copy of the pinout from the “last minute engineers” tutorial:
The full set is as follows:
- D13 -> 5 (CLK)
- D12 -> 7 (MISO)
- D11 -> 6 (MOSI)
- D10 -> 3 (CE)
- D9 -> 4 (CSN)
- 3V3 -> 2 (VCC)
- GND -> 1 (GND)
One interesting short cut I’ve found, is the Keywish “RF Nano”, which is an Arduino Nano with an nRF42L01 radio built in. You can find out more about them here. They are available from a whole range of third party marketplaces and are very convenient – they certainly eliminate a lot of jumper wires!

One of the Arduinos can be connected to a MIDI interface (5V, GND, RX, TX) and one can have an optional speaker connected to D8.


The Code
I’ve copied the approach from my Arduino I2C MIDI Interface in that I started with the built-in serial MIDI support for the Arduino MIDI Library and used that as the basis for an RF24MIDI implementation.
This relies on the comprehensive RF24 library which can be found here: https://github.com/nRF24/RF24. I recommend running the “getting started” example sketch to check that your Arduinos are able to communicate using the RF24 radios.
At present, the RF24MIDI library is only implementing a single two-way link between two radios (I don’t know what will happen if you try to create two instances or more links). You have to give each one an “address” in the RF24 radio system. Usually that is a based on a five character string, but I’ve limited it (to keep things simple) to one of 255 values (1 to 255). This is then turned into a five-character string “on air” of the format: “MIDIx” where ‘x’ becomes a character from the number passed in.
At present, it needs an address to send to and an address to listen on, but once that is done it can then send or receive over that comms link to the other address as if it was a cabled MIDI link.
#include <RF24MIDI.h>

#define RF24MIDIINADDR 50
#define RF24MIDIOUTADDR 49
RF24MIDI_CREATE_INSTANCE(RF24MIDIINADDR, RF24MIDIOUTADDR, RF24MIDI);

void setup() {
   RF23MIDI.begin(MIDI_CHANNEL_OMNI);
}

void loop() {
   RF24MIDI.read();
   RF24MIDI.send...(); // etc
}
There are two examples in the library:
- RF24MIDI Send and Receive demo – two sketches, one for each Arduino. One Arduino sends a series of MIDI notes that the other receives. The second Arduino will print the MIDI messages received to the serial port, but if you connect a speaker to D8 (via an appropriate resistor) it will also play them as “tones”.
- RF24 MIDI to Serial MIDI relay – this acts as a two-way link between an Arduino MIDI module connected on the RX/TX pins and the RF24 MIDI link. If you plug something into the MIDI IN port it will be transmitted out to the RF24MIDI receive demo sketch. Again adding a speaker means you can “play” the Arduino over the radio link.
Closing Thoughts
The video is showing a MIDI keyboard hooked up to one of my RF Nanos which is sending MIDI over to an Arduino Uno with an nRF42L01 module, driving a speaker.
This is a good first step. The things I wish to investigate next are:
- A demonstration showing proper MIDI IN and OUT over the radios – i.e. two-way MIDI.
- Some kind of multi-point configuration with a node sending to multiple receivers including a “broadcast”.
- The radios also support a “multiple senders to one receiver” mode which could allow for a radio “merge” unit of some sort.
- I also have a “USB interface” for nRF24L01 modules, which I believe presents as a serial port to a PC, so it might be possible to use it as a wireless MIDI interface from a PC.
- I’d like to see what other microcontrollers can support the nRF24L01.
- And it would be good to get some idea of performance!
There are also issues around the robustness of the code – I don’t know if a multi-instance sketch is possible for example, so there is plenty to keep me busy!
Aside, I note that there is a “MIDI over XBee radio” tutorial on Adafruit. You can read more about that here: https://learn.adafruit.com/xbee-radios/midi-link.
Kevin

Hi. Please I need help. I bought 2 boards NRF Nano and I want to connect wireless midi my Zynthian and midi accordion.but I can’t load the codes for tx and rx.Can i find the ino files for tx and rx ? Tks .P.S I’m a beginner
LikeLike
All my code is in the “examples” area of the GitHub: https://github.com/diyelectromusic/RF24MIDI
Is any of that any help? It all needs copying into your Library area of your Arduino installation.
Do note the warnings though about wireless MIDI, especially doing it this way – this is very, very experimental and I wouldn’t rely on it for anything important!
Good luck!
LikeLike
Hi.I upload examles transmitter and receive,but I don’t have a midi signal, the transmitter is connected to a keyboard on the 5-pin port. I made a midi in with 6n138 connected to 5 v, ground and RX. and on TX.For midi out I used a 5-pin socket with 220 ohm resistors on 5v and TX.Please help me.It’s my dream to be able to use wireless midi, but I don’t know what to do.I use this schematic for midi in and out .Thank you Cu respect Tubi
LikeLike
It is quite hard to give any specific advice without knowing more about your setup. Do you do Discord? This might be easier to discuss over there? If that works for you give me some means to get in touch privately and I’ll send a link.
In terms of your set up and way forward, if it was me, I’d be attempting to isolate all the individual elements now and attempt to prove one thing at a time. Typical things that go wrong in something like this for me include:
a) Getting pin 4 and 5 mixed up on the MIDI DIN sockets – I do this far more than I’d care to admit!
b) Getting RX/TX mixed up!
c) Verify the MIDI In and Out circuits independently – e.g. run a simple MIDI monitor that prints MIDI values for the MIDI IN and does nothing else; hardcode a MIDI send for the MIDI out to just play a single note; that kind of thing.
d) If there are any problems here, fix them first before trying anything related to the wireless.
e) Double check MIDI channel numbers, again this is something that catches me out a lot!
f) Work on the radio side without any serial MIDI so you can use debug Serial.print statements to show what is going on.
h) In fact, make sure some of the example (non-MIDI) nrf42 library examples work for you between your two nodes, just to check all is ok on the radio side.
i) Consider if it is worth using a software serial MIDI link for RX/TX then you can keep using Serial.print statements for debugging as you connect up the radio and serial MIDI sides…
As I say it is hard to suggest specific things, but the basic principle is prove the individual bits and fix anything that doesn’t work, then bring them together in a controlled way to see how they work with each other!
Good luck.
Kevin
LikeLike