I’ve seen a few dedicated units for sending and managing patches for older synths and whilst they look really neat, I thought it would be worth me having a go and seeing what I could do myself.
This is my first attempt at pretty much the simplest hardware “patch librarian” I could imagine – it will allow you to choose from a list of stored patches and send them over MIDI.
Warning! I strongly recommend using old or second hand equipment for your experiments. I am not responsible for any damage to expensive instruments!
These are the key tutorials for the main concepts used in this project:
If you are new to microcontrollers, see the Getting Started pages.
Parts list
- Raspberry Pi Pico.
- Pimoroni Pico Display (or another ST7789 display and some buttons).
- Raspberry Pi Pico compatible 5-pin serial MIDI OUT.
- Optional: Pimoroni “dual expander”.
- A synth to control of course.
The Circuit
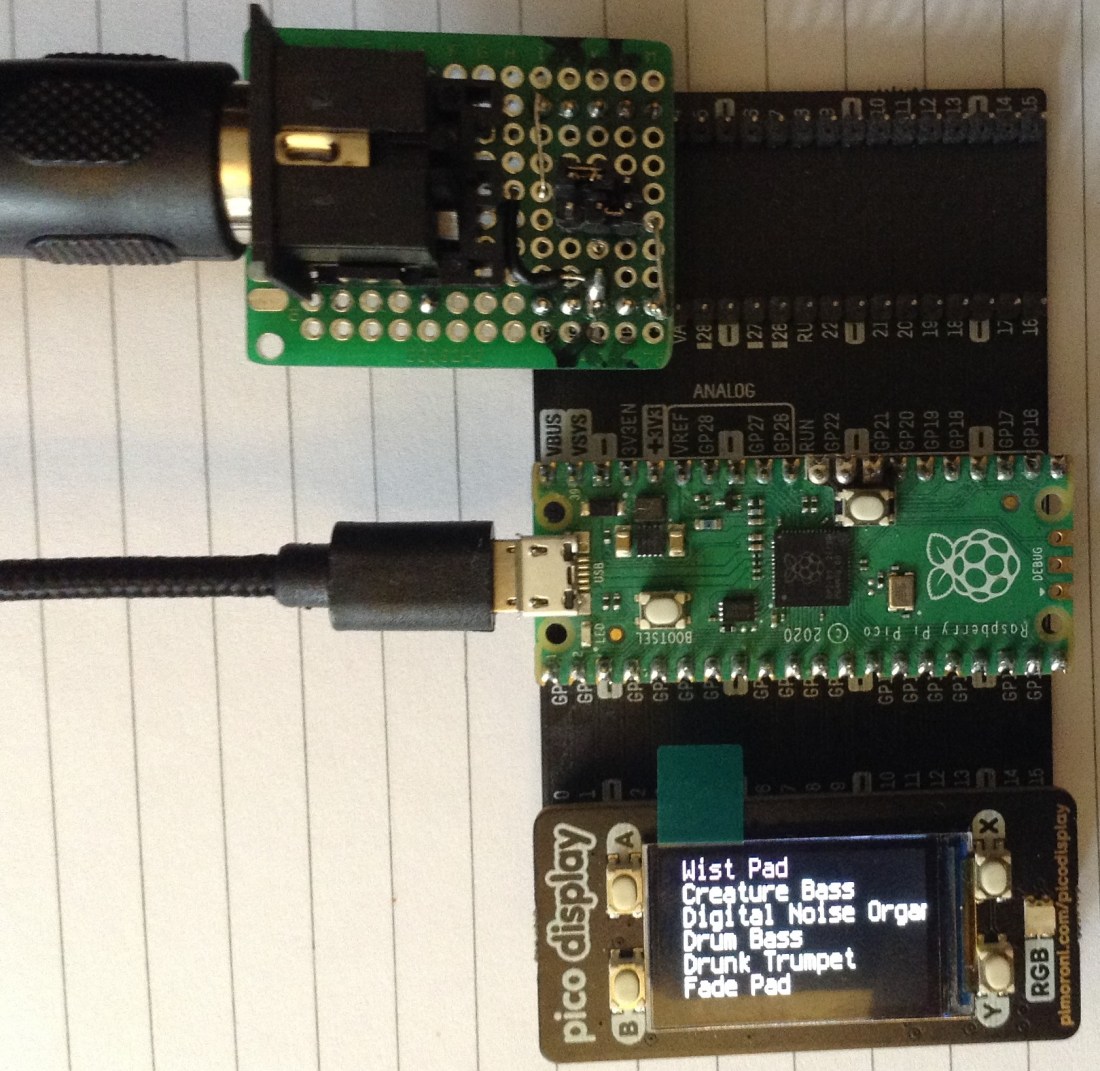
As this is using “off the shelf” components, there is no circuit diagram as such. I’m using a Pimoroni Pico display (details here) and a dual expander (details here). There is a strong possibility that any Pico display would work if you included the right modules and provided the correct pin configuration.
A serial (5-pin DIN) MIDI OUT interface is also required. That could be as simple as a MIDI socket and two resistors (as described here) or an off-the-shelf (3.3V compatible) module or a home made unit. I’m using my “reversible” MIDI OUT module from here in the above photo.
In terms of other connections, micro USB is required for power.
The Code
In terms of code, these were my main thoughts:
- I wanted to be able to store “.syx” files on the built-in disk with each file being a single patch.
- I wanted the display to give me a list of patches and give me basic navigation up and down the list.
- I wanted to be able to select one of the patches and have it sent out over MIDI directly from the corresponding .syx file.
- Ideally I’d support both USB MIDI and serial MIDI, but serial MIDI would be fine for a “first attempt”.
The Pimoroni display is very well supported in MicroPython, but I’ve opted for CircuitPython as I wanted to use the “Pico as a filesystem” element of it (the CIRCUITPY “disk” bit) to make it easy to load files onto the Pico. The Adafruit SD7789 display driver supports the Pimoroni Display and there is some example code to get you going: see the “st7789_240x135_simpletest_Pimoroni_Pico_Display_Pack.py” Adafruit example.
The following Adafruit CircuitPython libraries are required:
- adafruit_st7789_display.mpy
- adafruit_display_text
I initially thought I’d want to use the Adafruit MIDI library too, but in the end I opted for a simple “grab the bytes from the file and send them over the serial port” approach, which makes things a lot simpler.
One surprise for me was finding out that by using the Adafruit displayio subsystem, it automatically attaches a Python console to your display whether you want it to or not! This means that you might end up with all sorts of junk “printed” to your display. There doesn’t seem to be a way to turn this off, but adding a displayio.release_display() at the end of your code at least allows you to see the last thing you put on the display yourself during development.
This is how the Pimoroni display is setup. Notice it is an SPI display:
displayio.release_displays()
tft_cs = board.GP17
tft_dc = board.GP16
spi_mosi = board.GP19
spi_clk = board.GP18
spi = busio.SPI(spi_clk, spi_mosi)
display_bus = displayio.FourWire(spi, command=tft_dc, chip_select=tft_cs)
display = ST7789(
   display_bus, rotation=270, width=240, height=135, rowstart=40, colstart=53
)
The four buttons on the display board were set up in an array as follows:
SW_A = 0
SW_B = 1
SW_X = 2
SW_Y = 3
# Pimoroni Switches: A, B, X, Y
pimSw = [board.GP12, board.GP13, board.GP14, board.GP15]
sws = []
lastsws = []
for sw in range(len(pimSw)):
    sw = digitalio.DigitalInOut(pimSw[sw])
    sw.direction = digitalio.Direction.INPUT
    sw.pull = digitalio.Pull.UP
    sws.append(sw)
    lastsws.append(True)
I’ll be using lastsws[] to look for HIGH to LOW transitions – the switches are pulled-up so when pressed will results in a LOW signal.
In terms of accessing the CIRCUITPY disk, I went for a simple approach of using some of the “os” functions (more here) to check for directories and files as follows.
try:
    os.chdir("/syx")
except OSError as exec:
    if exec.args[0] == errno.ENOENT:
        print ("ERROR: No /syx directory found for patches")

files = os.listdir("/syx")
fnregex = re.compile("\.syx$")
fnames = []
for f in files:
    fname = fnregex.split(f)
    fnames.append(fname[0])
This also uses the regular expressions support to pick out all files with a .syx extension and grab their names for the fnames[] array, although it is fairly crude. There is a large onus on us to name files correctly at the moment.
When it comes to opening a file to stream the bytes out over MIDI, I can use a basic “open” in “binary” module (i.e. don’t interpret ASCII control characters) and sent that out over the serial port.
def sendSysExFromFile (fileidx):
    if fileidx >= len(fnames):
        return
    filename = fnames[fileidx] + ".syx"
    try:
        os.stat(filename)
    except OSError as exec:
        if exec.args[0] == errno.ENOENT:
        print ("ERROR: Cannot open filename: ", filename)
    else:
        print ("ERROR: Unknown error: ", exec.args[0])
    return
    print ("Opening: ", filename)
    with open (filename, "rb") as fh:
        sysex = fh.read()
    written = uart.write(sysex)
Notice how the open command uses the mode “rb” – i.e. read only, treat as a binary file, then it reads the whole file into memory before sending it out over the serial port.
When it comes to mapping names to the display, there are several key structures, lists and principles to be aware of:
- page is the current page of names we’re currently working with.
- name is the current index into the list of names we are working with.
- There are 6 names per page, so the number of pages is the number of names / 6 (plus one to ensure we catch incomplete pages at the end).
- The name is just the filename without the “.syx” extension. The names are stored in the fnames[] list.
- There are just 6 name labels defined and displayed. When a page changes, the text in these six labels is updated. Each label is initialised as 20 spaces and from that point onwards text is just updated when required.
- The six labels are treated as a “Group” as far as the display is concerned so they get updated together.
The buttons are used as follows:
- SW A – Scroll “up”, including going off one page onto the previous one.
- SW B – Scroll “down”, including going off on page onto the next one.
- SW X – “send” the selected patch over MIDI from the corresponding “.syx” file.
- SW Y – Page “down” – to allow quicker navigation through lots of files.
The text is displayed with a “scale = 2” which makes it easier to see on a smaller display but obviously means you can’t get as much on the screen.
There are many limitations though:
- Names are simply taken from the filenames.
- There are no “librarian” functions – it is assumed you’ll do all that via the filing system directly.
- It is serial MIDI only.
- It is “send only” – there is no option to pull data off your synth.
- I have no idea what the capacity is or how it behalves with 100s of patches!
- It will only read patches from a single directory “/syx”. There is no further structure.
- I’ve only tested it with single voices in a syx file. I don’t know what would happen if you tried to send it a bank of voice data. Update: See below!
But most importantly – there is no validation of the data. If it exists in a file and you tell it to send it to your synth, it will send it regardless – even if it is for a different manufacturer or could harm your synth! In fact it would even send a random blob of binary data if you called it a “.syx” file and selected it for sending.
You have to take all responsibility for ensuring the .syx files you obtain or create are suitable for use.
Update: Multiple patch .syx files
The code now supports SysEx “bank” files that contain several voice patches with details of which patch number to use. The key trick is to split the read in data based on the SYSEX START and SYSEX END markers, which are 0xF0 and 0xF7 respectively.
with open (filename, "rb") as fh:
    sysex = fh.read()

sysex_msgs = [e + b'\xF7' for e in sysex.split(b'\xF7')]
sysex_msgs.pop()
This uses the python “split” function to chunk up the data every time it finds a 0xF7 byte (SYSEX END). Note that split removes the delimiter though, so I have to add it back in (e + b’\xF7′). In the process of adding back in though, I end up with a stray 0xF7 on its own, hence the “pop” to drop the last entry.
At this point it is just a case of cycling through each entry with a short delay to allow the synth to catch up.
for sx in sysex_msgs:
    written = uart.write(sx)
    time.sleep(0.5)
Closing Thoughts
As always with Python, there isn’t a lot of code, but what there is has taken me quite a while to work out! That is the problem with not being so personally familiar with the language and environment.
I had initially thought about how to do this in Arduino, but then decided that the memory constraints and additional requirements for some kind of filing system made the Pico a much more sensible choice. I still think that was the right choice.
I’m really pleased with the result as a “first go”. There are many opportunities for improvements now:
- Allow the use of a rotary encoder.
- Support bigger displays.
- Allowing different directories of .syx files to support different synths.
- Possibly supporting a numeric keypad to allow entry “by number”.
- A slicker “user interface” with more functions.
- Allow some means of providing a “friendly name” for patches and particularly to allow the selection of individual patches from within a SysEx patch “bank” file.
I’d like it to support USB MIDI too, but I’ve stayed away from the Adafruit MIDI library for this one to keep things simple. I don’t know (yet) if there is an equivalent option for USB MIDI to just send it a block of data to output “raw”.
In the video you can see a Pico loaded with the voices from “CoffeeShopped” for my Casio CZ-3000 synth.
And of course it would be really, really neat to put this all into a nice little stand-alone box with a nice case!
Kevin

I created a version of this with more features. I’m calling it MIDIcommander, since it can send any MIDI command in addition to SYSEX files.
It is using an Adafruit PyGamer with a MIDI Featherwing plugged into it. It stores the SYX files on the SDcard, Uses the joystick to navigate folders and select files displayed on the color LCD display. It transmits MIDI contained in the files to the 5-pin DIN output jack on the MIDI Featherwing. Here’s the code: https://github.com/gmeader/pybadge/tree/master/pyGamer/MIDIcommander
LikeLiked by 1 person
Brilliant! Looks good. I keep almost buying one of these “all in one” type screen/button units… maybe now I really should just do it 🙂
The next I want to look at (I don’t know if yours does this) is cope with “patch banks”. Some SysEx files are collections of SysEx messages, one for each voice, each directed to a different bank/patch location, but they don’t seem to work for me. It may be that just having the code split the file into independent messages will do it. Alternatively, for my Casio at least, there is actually a short “protocol” for loading a patch – so it might need the two-way handshake to happen….
Basically, there is still plenty to do, so do keep me up to date with anything you find out too.
Update: I’ve just updated the code to cope with multiple voices in the same file. Seems to work now as far as I can see.
Kevin
LikeLike
Major update to my project that is a derivative of yours – moved to here: https://github.com/gmeader/pybadge/tree/master/MidiCommander
LikeLiked by 1 person
That’s looking really good! (I posted a link to my Twitter feed) 🙂
LikeLike