I’m really getting through my Raspberry Pi Synth “todo” list now! Next on the hitlist was doing something with Zynthian – the Open Synth Platform. This is an excellent software-synth that runs on a Raspberry Pi and is available in a fully self-contained kit or can be run “raw” on a Pi.
The recommendation is to use one of the high-spec audio boards (Hats) for the Pi, but I wanted to use it with my Clumsy MIDI. Here is how I got on and in the video you can see my “Zynthian Hello World”.
Warning! I strongly recommend using old or second hand equipment for your experiments. I am not responsible for any damage to expensive instruments!
These are the key tutorials for the main concepts used in this project:
- Raspberry Pi, Clumsy MIDI and MT32-Pi
- Zynthian Users Guide and Zynthian Box Building
- Zynthian Quick Start
- Beginners Headless Zynthian Tutorial
- Zynthian Kitless and Hopefully Headless
If you are new to Raspberry Pis, microcontrollers and synthesis, see the Getting Started pages.
Parts list
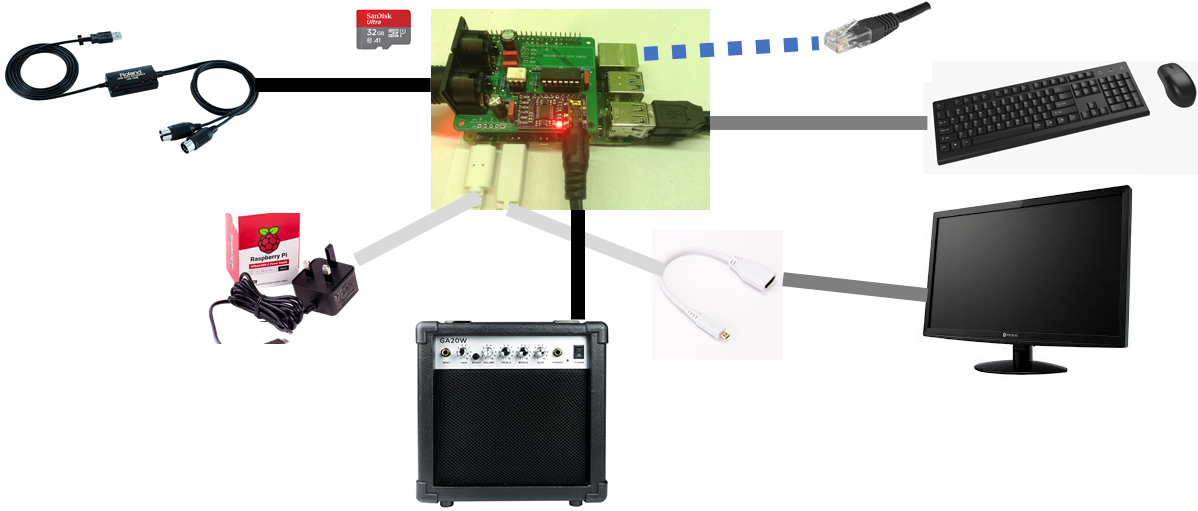
- Raspberry Pi 4 (2Gb is enough for this)
- Pi power supply, HDMI adaptor/cable, mouse/keyboard, ethernet, HDMI monitor
- 16Gb (minimum) micro SD card
- ClumsyMIDI interface (optional – details here)
- MIDI lead, MIDI source, amplification
The Circuit
Having ordered five PCBs when I built my ClumsyMIDI interface, I was keen to get another one up and running for use in a Zynthian synthesizer at some point. There are a couple of build difference from last time however:
- I’m not using the built-in I2C display for this interface.
- I’m using “stacking headers” for the GPIO interface to the Pi.

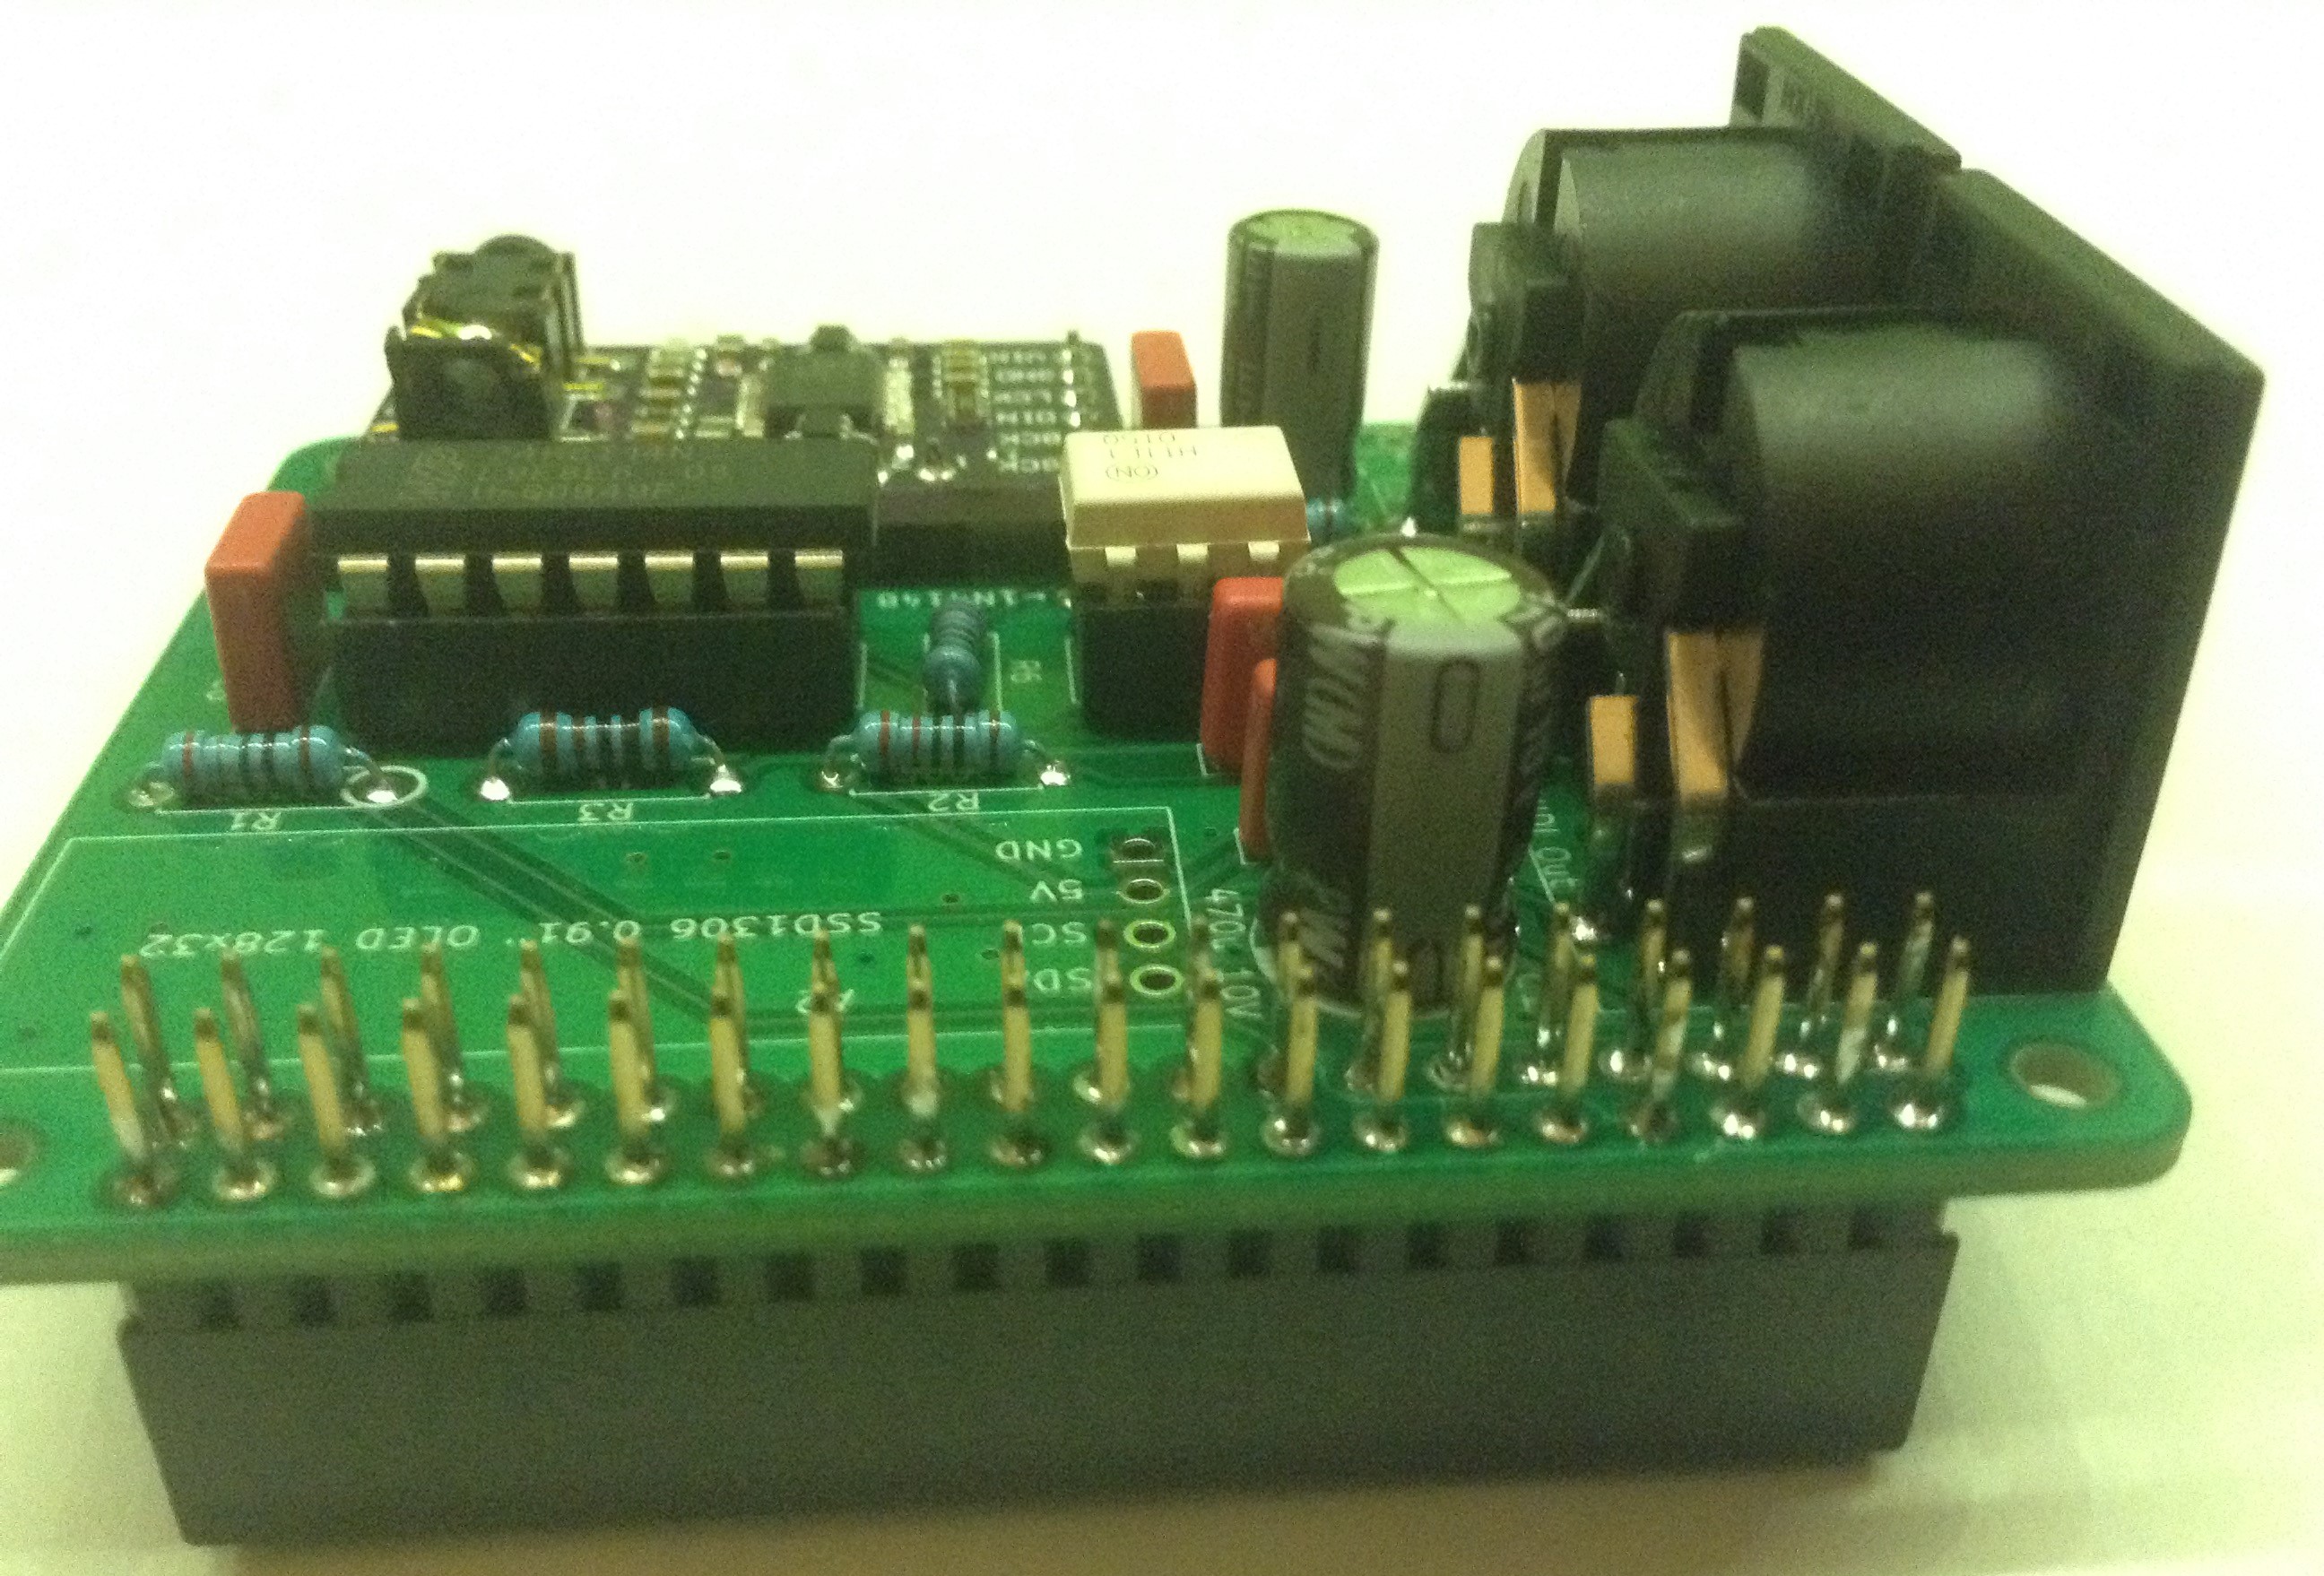
Once again, my cheap PCM5102 module had no jumper settings configured, so I had to follow the instructions on the Clumsy MIDI site to configure them correctly.
In terms of setting up the Raspberry Pi, there are many official tutorials, so I won’t go into details here, but my simple setup looked as follows.
Zynthian First Time Configuration
The basic principles for configuring Zynthian in “DIY mode” for the first time are covered here and here, but in summary, this is what I had to do:
- Download the Zynthian SD card image “ZynthianOS” as described here and “burn” it to the micro SD card using Balena Etcher.
- Plug all the bits together for the Raspberry Pi (board, SD card, HDMI monitor, power, keyboard, mouse, ethernet), but don’t plug in the Clumsy MIDI interface for the time being (if you are using one). The idea is to get a basic system up and running first.
- Connect the Raspberry Pi headphone socket to your amplification (and turn it down to a low setting!).
- Connect the Pi using Ethernet and turn it on. Once it has started up you have a few options for what to do next:
- Try connecting to the Pi over your local network by connecting to http://zynthian.local/
- If that doesn’t work, you need to find the IP address of your board.
- If you have the keyboard and mouse connected, try navigating to the “Admin” part of the user interface. ESC on the keyboard gets you “up” layers of the menus – Admin is on the top level menu. Alternatively use the mouse to click the “breadcrumbs” on the top of the screen. Under “Admin” there is a “Network Info” option which will tell you the IP address in use.
- If using a keyboard, you can use “CTRL-ALT-F3” to switch to a text-only terminal, login using “root” and “raspberry” as the password, then type “ifconfig” and it will tell you the network interface configuration in use. “CTRL-ALT-F1” or “F2” will get you back to the graphical interface.
- Once you have the IP address, type http://192.168.0.27/ (or whatever your own address is) in your browser.
- At this point you should see the Zynthian web user interface and be able to login with the password “raspberry”.
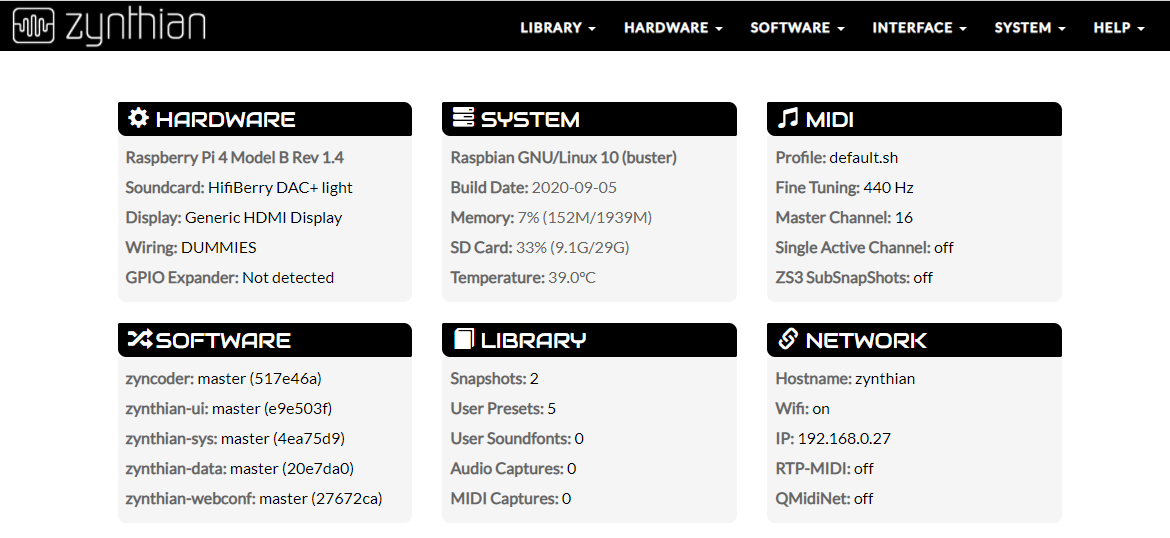
- You may find the interface reboots from time to time as the hardware configuration hasn’t been set up properly yet – this is ok – you should be able to change the hardware configuration between resets! The following need changing:
- Hardware -> Kit – change to “Custom”
- Hardware -> Audio – change to “Rbpi headphones”
- Hardware -> Display – change to “Generic HDMI display”
- Hardware -> Wiring – change to “Dummies”
- Option: at this point you can also add in a Wi-Fi configuration if you wish using System -> Wifi. You need to first “add network” and then turn it “On”.
- At this point you should be able to reboot and check everything works. I did the following on rebooting to make sure everything so far worked:
- Admin -> Test audio.
- Admin -> Test MIDI.
- Plug in a USB MIDI music keyboard and started mucking around with the synth engines…
- When complete, you can use Admin -> Power Off from the keyboard or System -> Power off from the web user interface to shut everything down and disconnect the power.
Warning: The first time I tried this I used the “update” option from the web user interface. This was a big mistake! It took a while to do the update, which I guess was a standard Linux Pi OS update (actually, no, it is a Zynthian update – but it is NOT recommended to do a standard Linux update!), and after installation my USB keyboard wasn’t recognised and I had significant performance issues even with some simple tests. I don’t know what the issue is, but I recommend only using official stable Zynthian OS images… I ended up re-“burning” the original image back to my SD card and starting again…
Zynthian and Clumsy MIDI
If you made it this far and are following along, this is the point where I then plugged in my Clumsy MIDI interface. This adds two things for me:
- Serial MIDI 5-pin DIN IN and OUT ports.
- An I2S PCM5102 DAC interface.
The MIDI needs no special configuration, it just seems to be picked up automatically. The DAC has to be set up in the Audio options. It turns out that the cheap PCM5102, as used by the Clumsy MIDI interface, will be found and automatically configured if you choose the Audio -> “Hifiberry DAC + Light” option.
You can see my complete configuration, as shown using the web interface, here.
My Zynthian “Hello World”
As with my previous messing around with a new gadget, I always like to do a “hello world” type application and once I heard the sound of the built-in ZynAddSubFX synth, I just knew what I had to do.
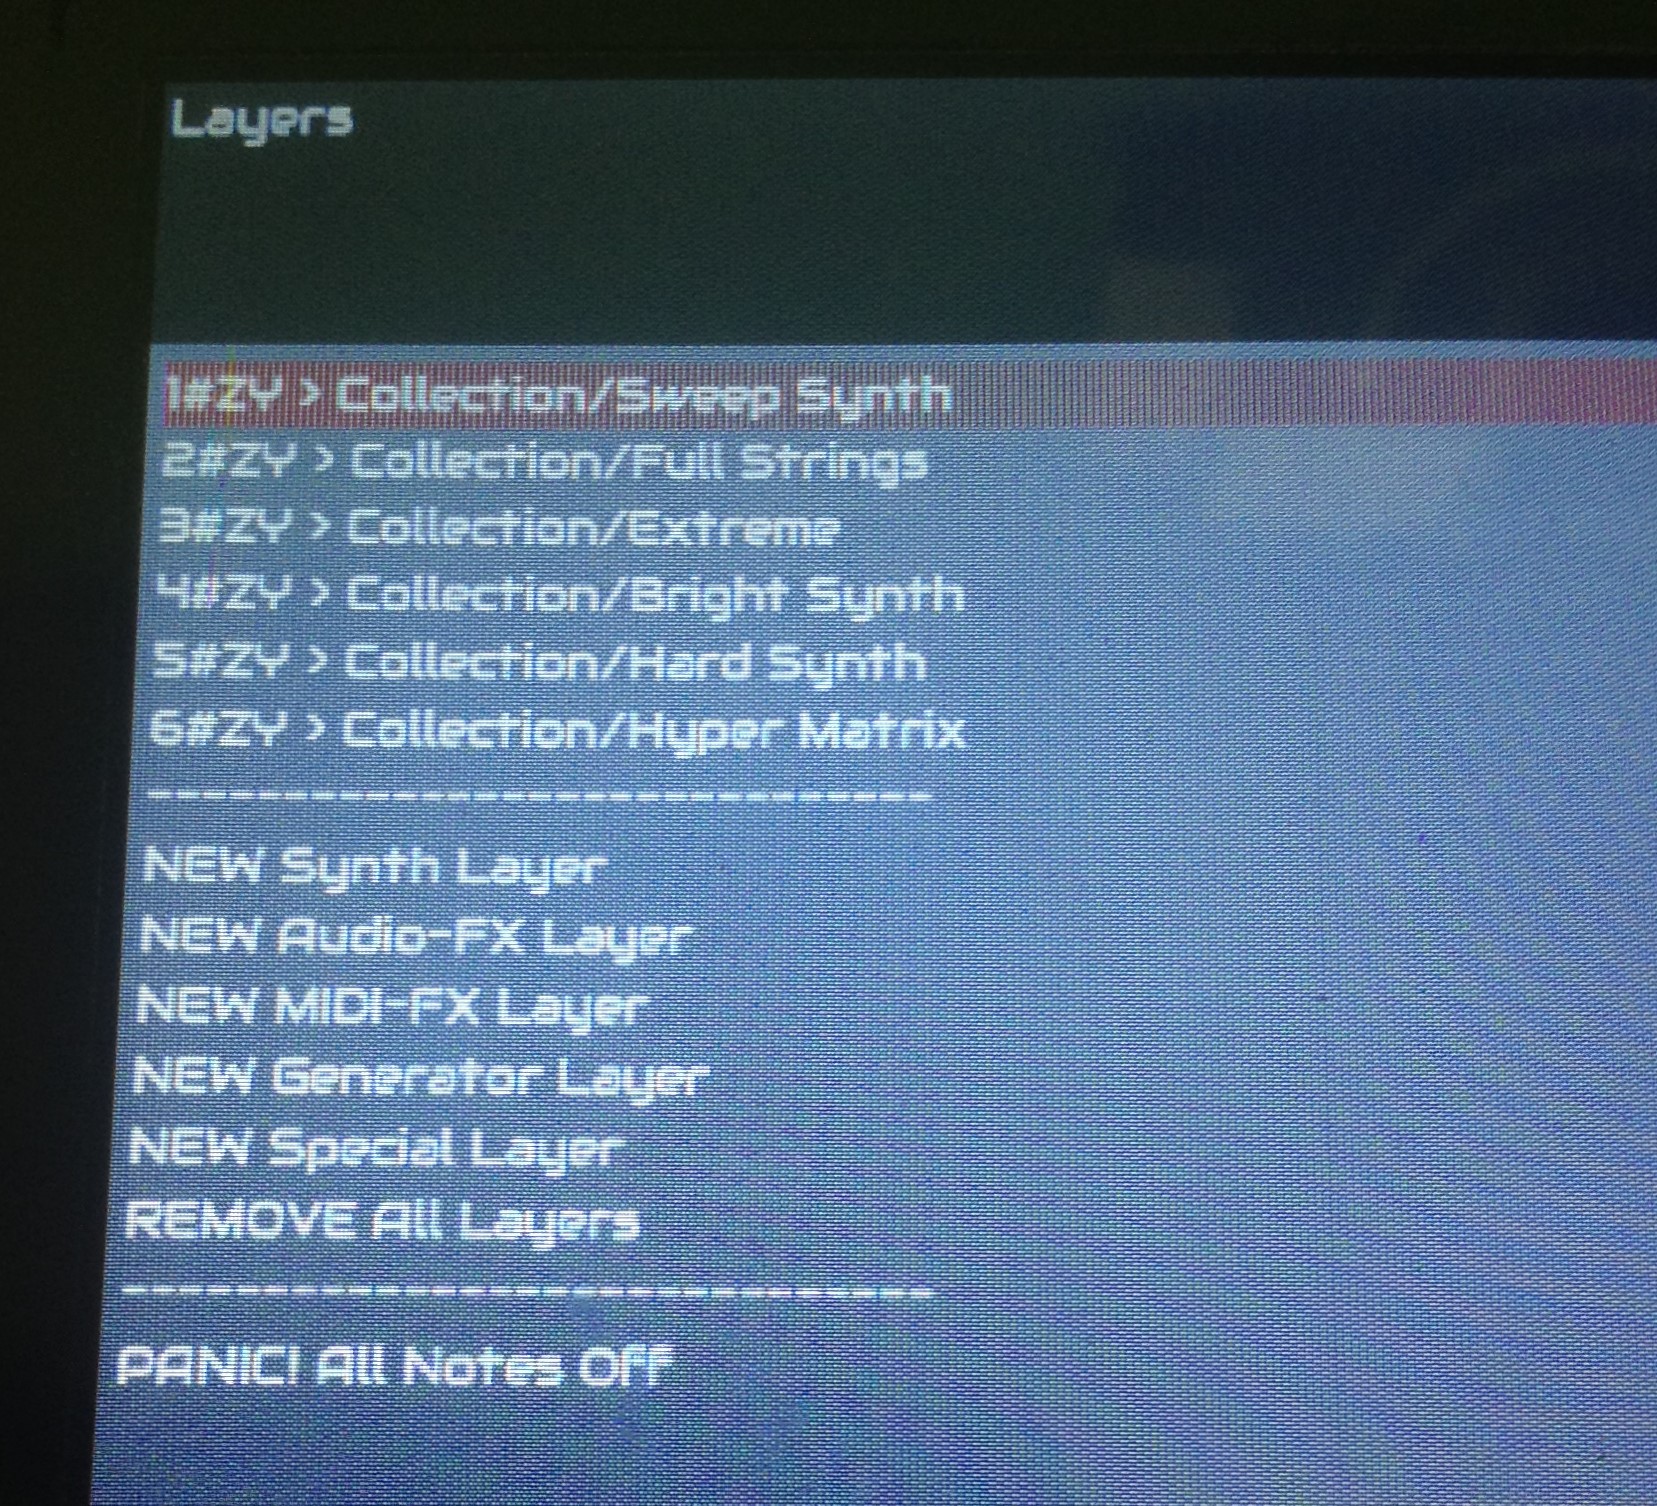
I’m using six synth layers (there are probably easier ways to do this, but for now, as I say, this is my “getting started” test) configured on MIDI channels 1 to 6. I have programmed in my “score” using MuseScore as usual, but just used a simple Piano sound. On exporting the MIDI file, I then opened it in MIDIEditor and removed the Program Change messages at the start of the file as I didn’t know what Zynthian would make of these at present.
Here is my Zynthian configuration.
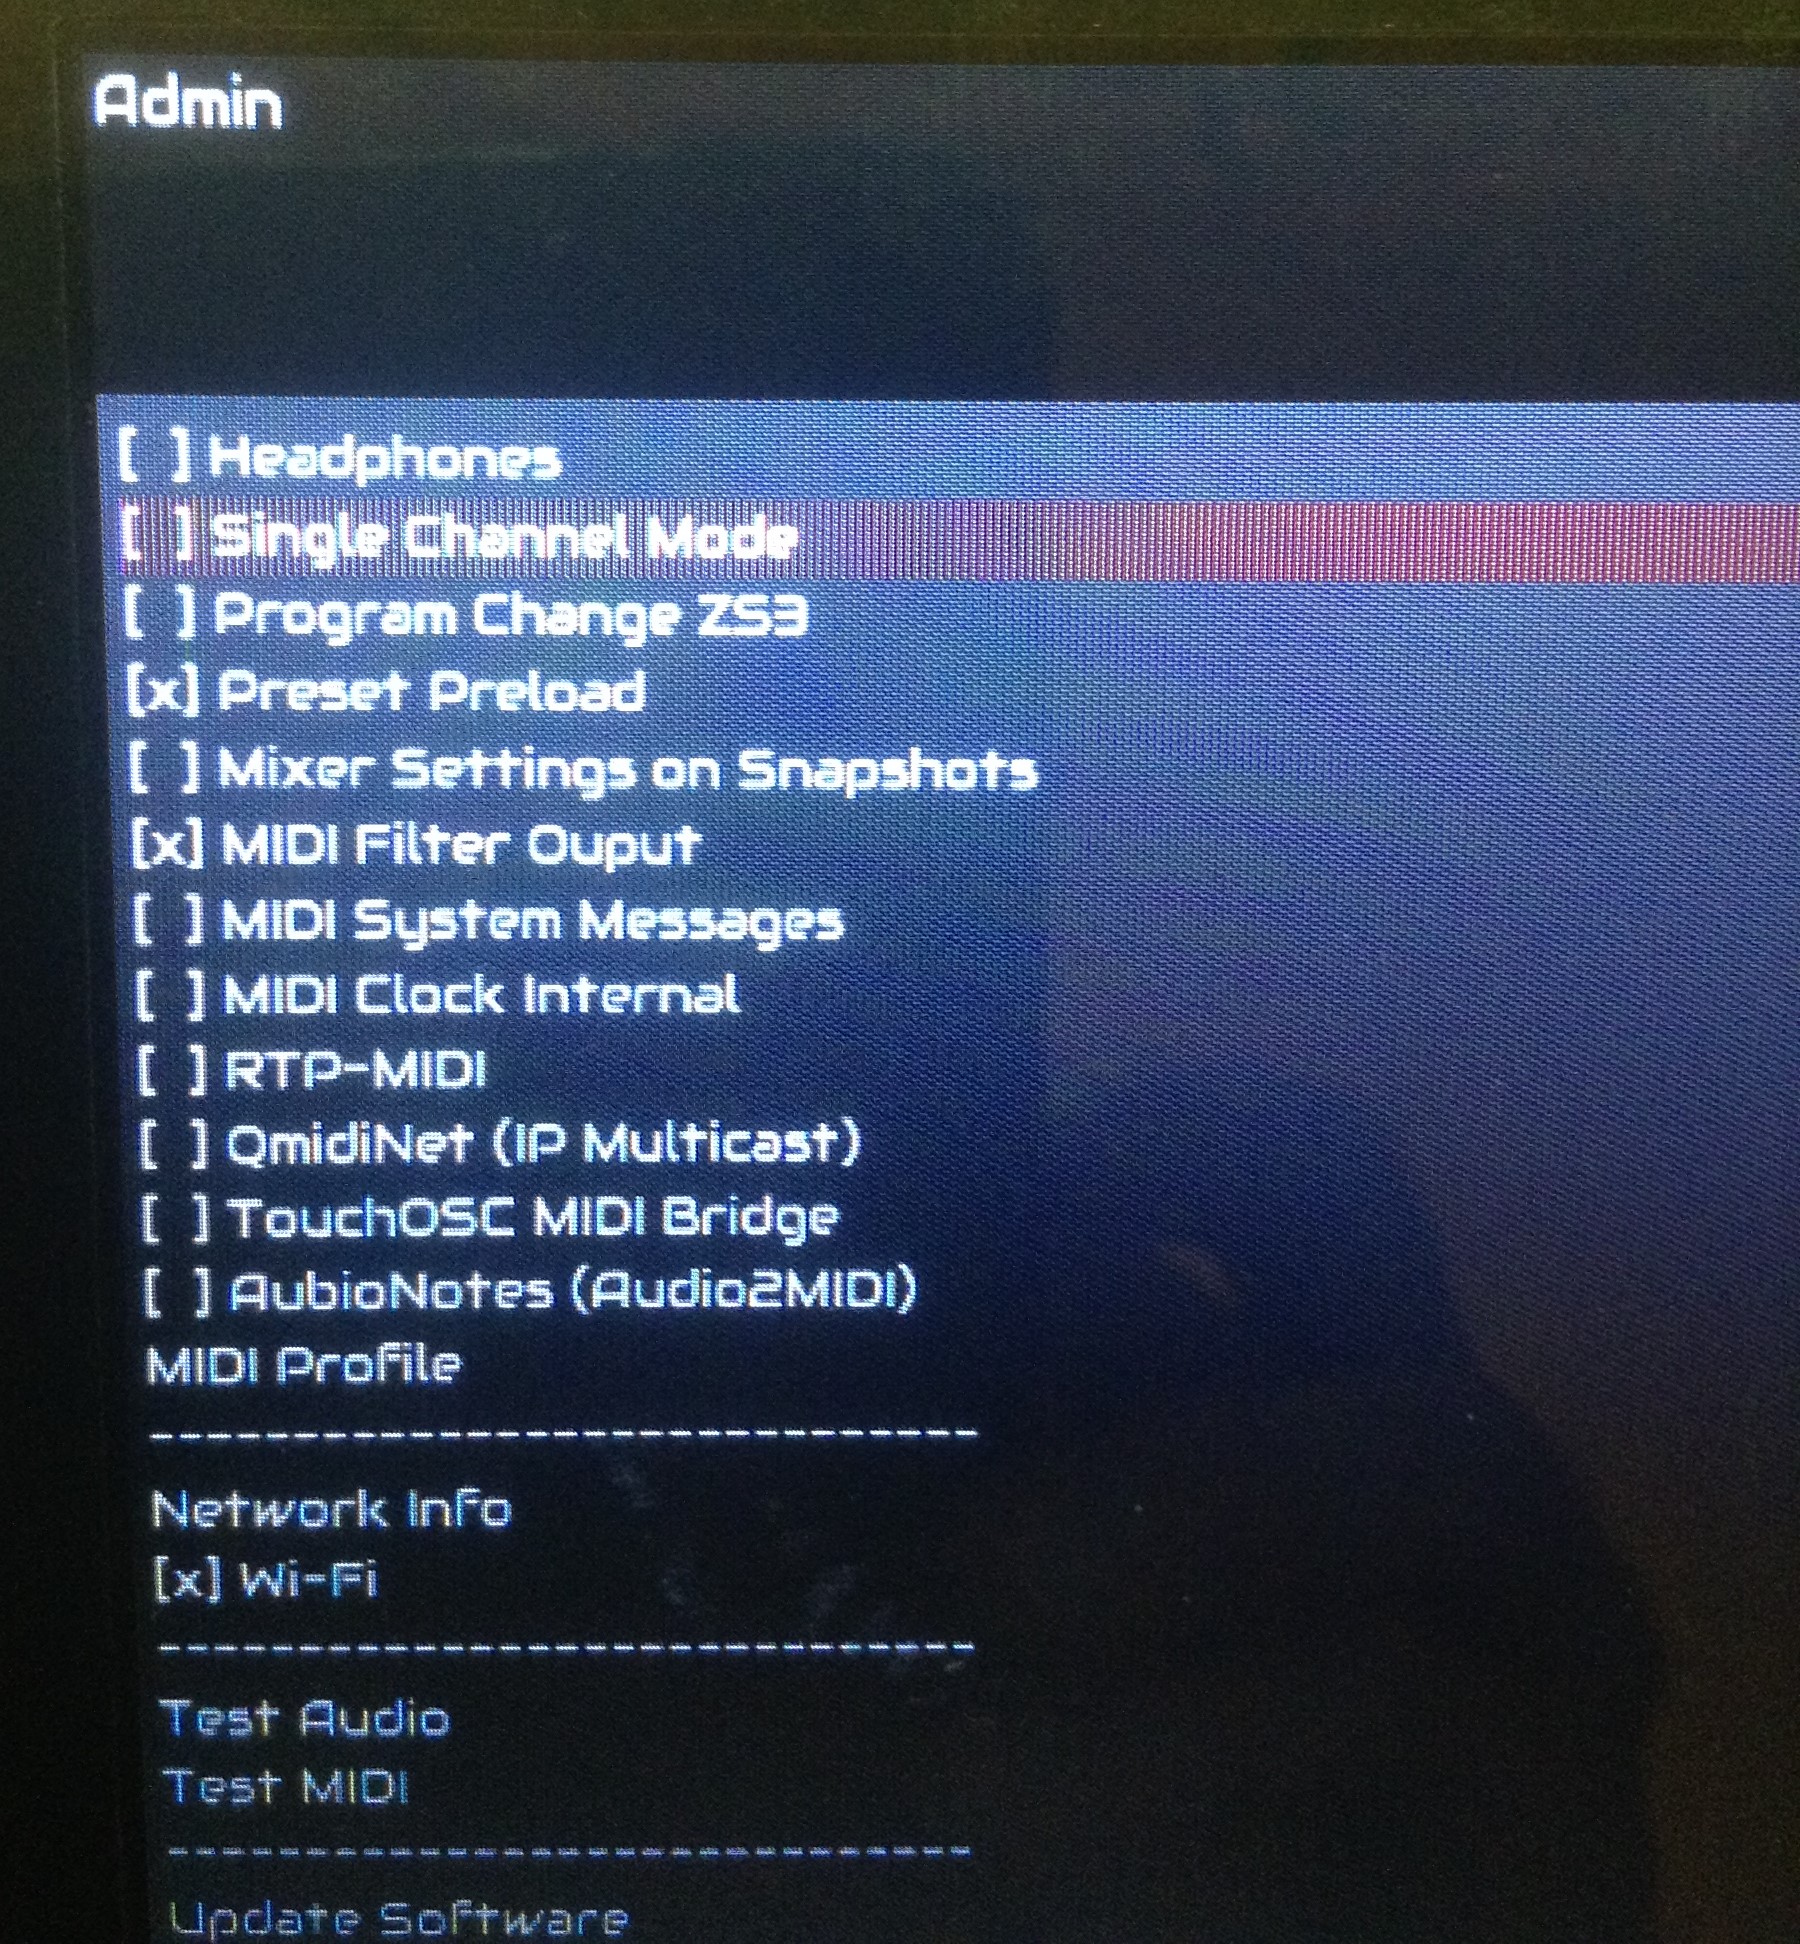
One thing I also had to do was to instruct the synth to listen on all MIDI channels. This is done by disabling the default “Single Channel Mode” in the Admin interface:
At this point I then saved everything as a “snapshot” so I could load it up again later. Details of how to do that can be found here (note how you can only rename the snapshot from the web user interface).
Now I could plug it into an amp, hook up the MIDI interface (my trusty Roland UM-ONE) and the video at the start of the post was the result.
There are some odd things though. In the MIDI log there are spurious PITCHWHEEL events after every note, which was very confusing for a while – I thought I’d got something wrong with the serial ports! Here is an example sending single notes from MIDIOx.
CH#01 NOTE_ON 52, Vel: 100
CH#01 PITCHWHEEL 0
CH#01 NOTE_OFF 52, Vel: 64
CH#01 NOTE_ON 48, Vel: 100
CH#01 PITCHWHEEL 0
CH#01 NOTE_ON 50, Vel: 100
CH#01 PITCHWHEEL 0
CH#01 NOTE_ON 52, Vel: 100
CH#01 PITCHWHEEL 0
CH#01 NOTE_ON 53, Vel: 100
CH#01 PITCHWHEEL 0
CH#01 NOTE_OFF 53, Vel: 64
CH#01 NOTE_OFF 52, Vel: 64
CH#01 NOTE_OFF 50, Vel: 64
CH#01 NOTE_OFF 48, Vel: 64
According to the Zynthian forums, it does this as part of the internal MIDI routing to allow for the option of setting the global “tuning”. There is a MIDI option for “MIDI fine tuning (Hz)” which is set to 440, which is standard tuning and I guess what most people will be using most of the time… It looks like this will go at some point though, as this issue asks for it to be fixed. It certainly can’t help performance to be sending twice as much data for a note on, and I wonder if that will trash MIDI “running status” too…
Closing Thoughts
I have literally only just spent a few hours looking at Zynthian – there is so much here – but I wanted to get this “basics” post up. I am so looking forward to having a proper explore. Hearing these sounds, its hard to believe this is all being synthesized in real-time on a single £35 computer.
One of the reasons for leaving off the small display for the clumsy MIDI and using stacking headers was to experiment with some kind of hardware user interface at some point. It would be great to have a simple way to navigate the embedded UI.
In the mean time if you want to see some of the potential here, then I recommend exploring the Zynthian forums and see what others have already done.
A massive thank you to all the developers who worked so hard on all the components, code and designs to get it this far, and for releasing it as an open source project enabling people like me to come along and have some fun with it all.
Kevin
