After building my Arduino Top Octave Generator I went off an ordered some binary counter devices to use to produce some “lower octaves”. This is a test run project to explore how the 74HC393N devices I have work.
- In part 2 I start to explore how to expand this to multiple keys and octaves.
Warning! I strongly recommend using old or second hand equipment for your experiments. I am not responsible for any damage to expensive instruments!
These are the key Arduino tutorials for the main concepts used in this project:
If you are new to Arduino, see the Getting Started pages.
Parts list
- SN74HC393N binary counter
- 555 or 556 timer chip
- 8 ohm speaker or old headphone speaker
- 1x 1kΩ resistor
- 1x 220Ω resistor
- 1x 10kΩ potentiometer
- 2x 10uF capacitors
- 1x 100nF capacitor
- Either: 8x red LEDS plus 8x 220Ω resistors
- Or: 8-way LED “bank”
- Breadboard and jumper wires
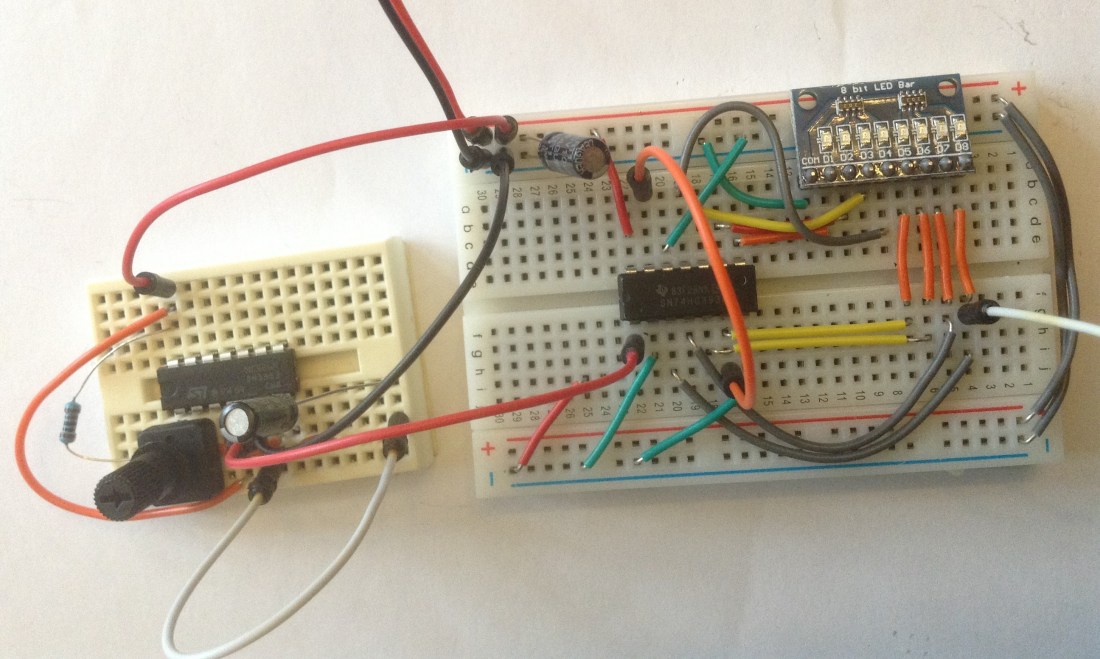
The Circuit

This circuit is a test to get to know how the 74HC393 works. There are two parts – the 74HC393 counter part and a signal generator part based on a 555 or 556 timer chip. I’m using a 556 as I don’t have any 555s lying around, but the 556 is just a “dual” 555 and I’m only using one of the timers.
In terms of the signal generation, the 555/556 produces a square wave with a frequency determined by the choice of capacitor and the setting of the potentiometer. I have two choices of capacitor here and a jumper wire allows me to choose between them. I’m using a 10uF capacitor for a slower count, so I can watch the 393 in action, then switch to a 100nF capacitor for more audio-level friendly frequencies to hear the 393 at audio frequencies (see the video).
The 393 part of the circuit takes the input from the timer to the 393’s clock pin for the first counter (CLK1). The four outputs from the first counter are linked to LEDs – either using separate LEDs and resistors as shown in the circuit diagram, or in my case to simplify wiring I used an 8-way “LED bar” again that includes the resistors alongside surface mount LEDs (see the photo).
The most significant output from the first counter (1QD) is connected over to the clock for the second counter (CLK2), and the four outputs from the second counter are linked to four more LEDs.
The two “reset” pins for the counter (CLR1, CLR2) are tied low to GND.
The only other thing to note: this is powered from 5V, in my case from a USB power supply, but I was finding the functioning of the counters very erratic, until I realised that there must be some interference on the power lines when the 556 was running. Dropping a 10uF capacitor across the power lines seems to have fixed it.
For an audio output, I hooked in a 8Ω speaker and 220Ω series resistor to GND and whichever output pin I wanted to examine from the counter.
In Use
When on the 10uF capacitor, you can clearly see the binary counter counting on the LEDs. This is accompanied by a clicking as the frequency of the counting isn’t anywhere near the frequency required for audio. If I turn up the frequency a little using the potentiometer, we can just start to hear the clicking become a tone, but at this point it is much harder to see the LEDs counting.
If I swap over to the 100nF capacitor then there is a clear tone, but now we can’t see the LEDs counting, it is too fast. However, moving the speaker between the counter pins we can clearly hear the different octaves now being produced by tapping off the audio at different pins.
This works because with a binary counter, each “digit” will toggle twice as slowly as the previous digit – the counter is counting in 1s, 2s, 4s, 8s, 16s, and so on. This is ideal for our purposes, as if you half the frequency of a sound wave, it drops an octave.
Closing Thoughts
Each 74HC393 includes two binary counters. In this experiment I’ve just tied them together to form a single 8-bit binary counter and you can see it counting on the LEDs in the video – at least at the lower frequency anyway.
For scaling a Top Octave Generator, one counter is required for each of the 12 semitones, and each “bit” of the counter is another octave. If I want a full 8 octaves, I would therefore need 12 devices. For 4 octaves, I can use the two counters in each device independently so would only need six in total.
That is the next thing to do – hook some of these up to the Arduino Top Octave Generator – it will replace the 555/556 as the clock source – and see how things go.
Kevin
