This project uses the Arduino tone() function to make a sound coupled with a set of eight buttons that act as a simple one octave music keyboard (with no accidentals).
- In Arduino Nano 12-Note Keyboard I extend this to 12 notes using an Arduino Nano and some stripboard.
- In Arduino Nano MIDI Keyboard I add MIDI out support.
These are the key Arduino tutorials for the main concepts used in this project:
If you are new to Arduino, see the Getting Started pages.
Parts list
- Arduino Uno
- 8 ohm speaker or old headphone speaker
- 8x 10k resistors
- 1x 220 resistor
- 8x buttons
- Breadboard and jumper wires
The Circuit
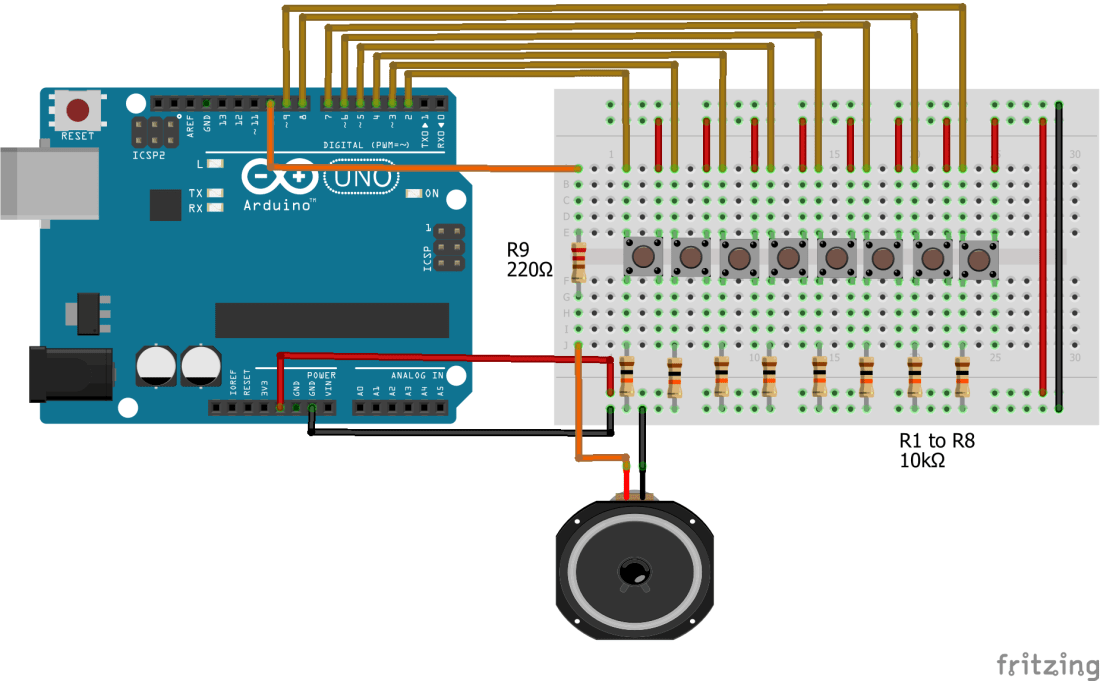
Switches like the ones I’ve used have four legs, arranged in pairs. The switch connects one pair to the other pair, so make sure your switches go the right way round. They are also a bit fiddly to push (and keep) in the breadboard, so if you have any problems, make sure they are pushed right in and not popping out.
Some breadboards have coloured “rails” for the positive and negative power lines. In the above, the positive power lines are the two inner “rails” and the negative (GND) are the two outer “rails”. Double check the wiring to the power rails.
Once again you can use an old speaker or the speaker out of an old pair of headphones.
There are many ways to set up many buttons like this, but I’ve gone for the simplest – using one digital input pin for each button. This uses the most pins but is easiest to understand how it works.
The Code
The switches are wired up in a “pulled low” default state. When not switched the input is connected to GND through the resistor so will be read as LOW in the code. When the switch is pressed it will be connected to +5V and the corresponding input will be read as HIGH.
The code continually scans the switches in turn and whilst a switch is pressed will feed that tone to the output pin. If several switches are pressed at once, then the highest note will win as the last one read. The note will keep playing until the switch is off or a higher note switch is detected.
Once again I am using the defined notes from the toneMelody tutorial.
Closing Thoughts
This is a very simple example, but the idea of using an Arduino to read a range of sensors (in this case buttons) and generate corresponding notes of its own (in this case using tone()) is the basis of many music projects you’ll find.
Particular fun can be had using capacitive sensing inputs as your “keyboard” but I’ll save that project for another day.

Kevin
