This site will be bringing you simple electronic music projects utilising easily available components and microcontroller platforms such as the Arduino.
If that is largely gobble-di-gook to you, then this short introductory video from Make Magazine should help!
If you want a “everything in one place guide” to building musical projects with microcontrollers, you can find pretty much everything you’ll need in Brent Edstrom’s “Arduino for Musicians” book (see below).
On this page:
- Some cautionary notes.
- Just getting going!
- Kits
- Why Arduino and Music?
- References and Key Educational Resources
- Boards used in my projecs
- Getting Started with Arduino
- Reading Fritzing diagrams
- Making and Designing PCBs (spoilers, it links off to here)
- Micropython and Circuitpython
- Using the Wemo D1 and Arduino
- Getting Started with analog synths
First Some Caution!
These projects will be hooking up electrical components to low-voltages and computer-connected electronics. This is usually a safe thing to do, but like all things there are a few things to be wary of when building projects like these:
- NEVER let your home-made electronics get anywhere near mains electricity. Hopefully this should go without saying, but I’ll say it anyway! The closest any of these projects should ever get to your mains supply is using an appropriately marked and sealed off-the-shelf power supply appropriate for the electronics board you are using. Typically this would be powered using USB connectors or a “barrel jack” from a plug-in, sealed adaptor serving either 5V (USB) or 9V to 12V (jack).
- Don’t power your project from your computer’s USB Port. Whilst you can usually power your projects from your computer’s USB port, I strongly recommend you do not do this. If there is a fault with your circuit, then it is better to short out a relatively cheap power supply than permanently damage a USB port on a computer (especially a laptop, which isn’t easily fixed).
- Always double check your wiring. Ideally use a multi-meter to check that there are no obvious short circuits between the +5V and GND connections anywhere in the circuit before powering it up for the first time. If it doesn’t work straight away, turn it straight off just in case, before you go and think about what might be going wrong.
- If you decide to learn to solder, find a good tutorial and make sure you do it safely in a well-ventilated area.
- If you want to plug any of these projects into a music keyboard or computer, I strongly recommend you use an old, second-hand, hand-me-down one for your experiments, and you do so at your own risk. I am not responsible for any damage to USB, MIDI, power, audio ports or any other part of your expensive equipment (sorry)!
But I Just Want To Get Going!
Ok, in that case, get yourself an Arduino Uno (R3 – revision 3 – is typically widely available) and follow Lady Ada’s Learn Arduino lessons to get started; or one of the boards supported by Adafruit’s Circuitpython (e.g. a Raspberry Pi Pico) and follow the Welcome to Circuitpython learning guide.
Then get yourself a solderless breadboard, some jumper cables, and some basic electronic components as described in each tutorial. Starter kits are available with a selection of commonly used bits and pieces and might be a good way to get started. I’ve put together a general Kit List here.
If you want to get started with MIDI, then I can recommend the Make “MIDI for Makers” guide.
For any projects that require a speaker, I’ve used either old 8 ohm impedance speakers from an old TV or higher impedance speakers from an old (cheap, and dead) pair of headphones.
For a great round-up on how to get started with DIY synthesis, I can strongly recommend Syntherjack’s “Synth DIY – How to Start“.
Can I buy kits?
Not from me. If you want something a bit more “ready made” then there are lots of MIDI DIY kits out there. Here are some ideas to browse:
- The MIDI category on Tindie
- Audio and Music category on Crowd Supply
- MIDI projects on PCBWay
- Specific Music projects can found from the likes of Rakit and others.
- General electronic kits (some with a music flavour) can be found at Pimoroni, The Pi-Hut, Adafruit, Sparkfun, Cool Components, Hobbytronics, Brown Dog Gadgets, IC Station, MitchElectronics, and more…
Note: I have no affiliation with any of these and haven’t used most of their kits (although I buy from some of the general maker suppliers mentioned).
Why Arduino and Music?
If you want some inspiration for what people have done with the Arduino and similar boards and music, just search for “Arduino and music” on YouTube, and you’ll find videos like this:
- The Final Countdown on mechanical orchestra
- Pirate’s of the Caribbean on mechanical glockenspiel
- Vivaldi’s Summer using motors
Not to mention a whole range of examples of inventing new or wacky instruments now made possible thanks to some simple electronics and computers. Here are a few lists of projects that people have created and documented, from the very simple to the incredibly complex:
- List of Arduino Music projects from Arduino.
- List of music projects from hackster.io.
- Music related projects on Instructables.
- Music projects on Hack-a-day.
- Music projects on ElectroMaker.
- List of DIY MIDI project sites from the MIDI Association.
- List of non-commercial MIDI projects from the MIDI Association.
There are so many excellent YouTube channels dedicated to building home-made electronic music some based on digital techniques with microcontrollers like the Arduino and some using analog techniques. Here are some fun ones that I can recommend you have a browse.
References and Key Educational Resources
There are also some excellent information sites out there too. Some I can recommend taking a look at include:
- Notes and Volts – covers a lot of the basics that you’ll find here on my site.
- Opinionated Guide to Music, Modular Synths and MIDI – a “raw, no holds barred” view of synthesizers and MIDI (contains swearing)!
- Open Music Labs Learning Guides – some detailed technical information on topics of relevance to electronic music.
- Zoe Blade’s Notebook – and eclectic mix of thoughts and essays of relevance to electronic music.
- Jeffrey Hass’s Introduction to Computer Music – an online textbook covering all aspects of synthesis and MIDI.
- Music from Outer Space – for the real enthusiasts, there is where the Real Stuff Happens.
- lcamtuf’s excellent series of articles – explaining electronics and answering common questions in detail.
There are so many other sites and forums, but this gives a flavour of some of the things that are out there.

And here are some excellent books on the topic that go much further, and with a lot more expertise behind them, than on my site.
- “Arduino for Musicians” by Brent Edstrom is an excellent introduction to using microcontrollers, specifically the Arduino and Teensy, for musical projects. It is great for beginners and starts with a really great “high level overview” of microcontrollers, programming, sensing and MIDI before getting on to a range of projects from MIDI controllers through to direct digital synthesis.
- “Handmade Electronic Music” by Nicolas Collins is great for inspiring projects most of which don’t require much by way of equipment or expertise. There is a real focus on “just do it and see what happens” and the vast majority of the book is simple electronics rather than microcontrollers, which only appear towards the end. I really enjoyed this book.
- “Arduino Music and Audio Projects” by Mike Cook in my view is aimed at those more experienced with microcontrollers and electronics and looking for more stretching projects with a focus on “the right way to do things”. You won’t find any “hey this pretty much works” in this book, you’ll find the right ways to do things from the start, and a number of side discussions about how many of the projects you’ll find online (including mine on this site) take short cuts and “get away with things”. It is a good book to read once you’ve got your feet under the table and feel at home reading more complex programmes and circtuit diagrams.
- “Make: Analog Syntheiszers” by Ray wilson is a short book focusing on analog synthesizers, introducing all the main building blocks and electronics principles leading up to a tutorial on how to make the “Music from Outer Space” “Noise Toaster” synthesizer.
Boards Used in My Projects
I’ll try to provide examples of the projects using a range of microcontroller boards where applicable. Typical boards that I’ll be using include:
- Arduino Uno
- Arduino Nano
- Raspberry Pi Pico
- From Adafruit: the Feather, the Trinket M0, and the ItsyBitsy.
- Wemos D1 Mini
- Seeed XIAO series
These are all easily available from a whole range of suppliers and are all programmable using the Arduino Integrated Development Environment (Arduino IDE).
Some of the code provided will be pretty interchangeable with a bit of minor tweaking between any of these boards, but some of the projects will be specific to that board.
There are also a number of boards with a large educational remit that can be used for musical applications:
Some more specialist boards with a musical following or interesting set of applications include:
- The Teensy USB Development Board
- The Touch Board from Bare Conductive
- The Daisy Seed from Electro-smith
These might all make an appearance at some point in my projects.
Getting Started with Arduino
I’ll try to keep each project relatively self-contained, but will rely on some basic knowledge – such as how to install and run the Arduino environment, how to connect your board to your computer and how to get code uploaded and running on your boards. There are many tutorials online to get you started, for example:
- The official Arduino Getting Started pages.
- Lady Ada’s Learn Arduino Lessons.
- Makerspaces Arduino for Beginners and Simple Arduino Uno Projects.
- Maker.io How to Get Started with Arduino.
If you’re not sure about any of this, then the Lady Ada Lessons and an Arduino Uno are a great place to start.
Reading Fritzing Circuit Diagrams
I use Fritzing to document any circuits and it’s great for my level of electronics (i.e. enthusiastic amateur!) and I’m sure a lot more. My circuit diagrams are always shown “from the top” looking down on the components. This seems natural and hopefully obvious for solderless breadboard pictures, and probably not too obscure for those using proto-board, as long as you remember the soldering happens on on the back (naturally).
For such diagrams, if you are soldering one up yourself, you can decide if it makes more sense to have the connecting wires on the top or bottom of the board. I’ll often use the legs from components as connecting wires, routing them on the underside of the board and when it comes to the actual build, may end up routing wires slightly differently too.
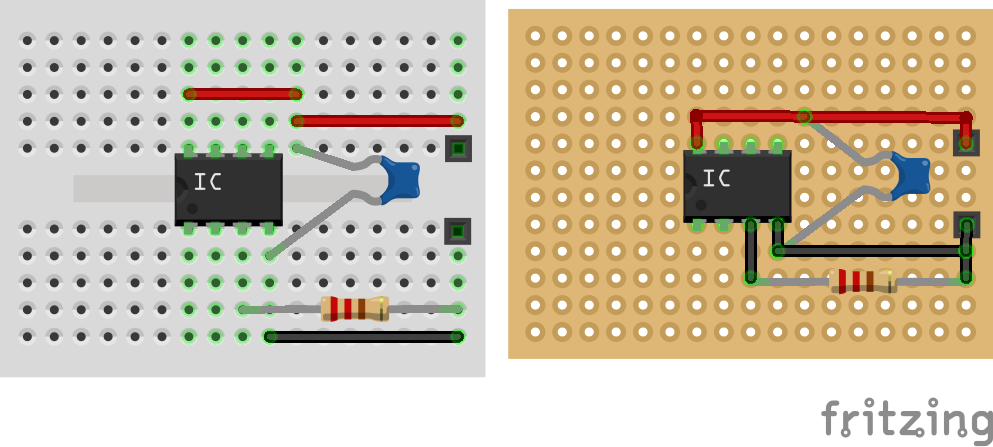
But things can get a bit weird when you see a stripboard diagram, as it looks like the copper strips are on the top. I draw them like this so we can see what the circuit looks like, but when building them you have to imagine the copper strips “pushing through” the PCB to the underside, so that when you turn the board over to solder the components, you have to imagine a mirror image of the circuit.
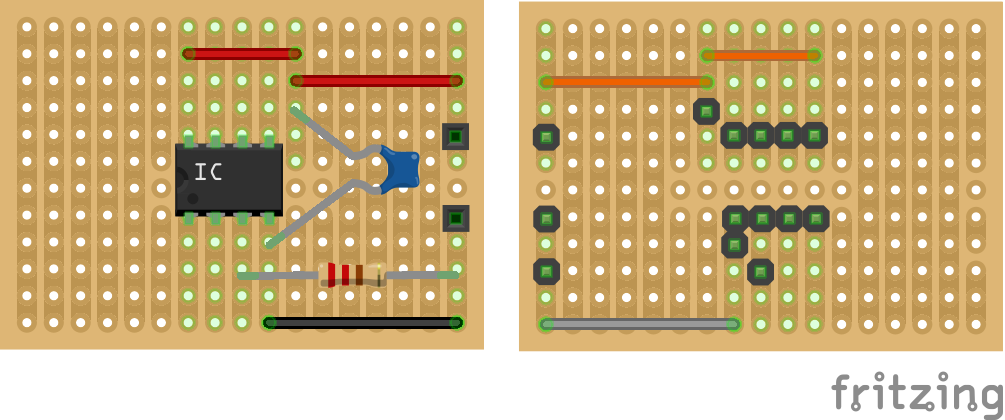
So using this same example, I might draw the circuit on the left, but when you flip your stripboard over for soldering, the connections are going to look more like those on the right. After a while you get used to “seeing through” the PCB.
There are other software tools out there that allow better views of the “solder side” of stripboard, but considering most of the circuits are using protoboard or solderless breadboard, I like the finished, more friendly feeling results that Fritzing provides.
Making and Designing PCBs
An increasing number of my projects are custom PCBs. For this I use KiCad.
I don’t have a detailed list of tutorials for using KiCad or for getting PCBs manufactured, but there are some resources and “getting started” notes on my PCBs page.
I documented my own first attempt, complete with “gotchas” here: Arduino Uno Dual Merge MIDI “Shield” – Part 2.
MicroPyton and CircuitPython
Some of the boards, specifically those based on the more powerful 32-bit processors such as that used on the Raspberry Pi Pico or the SAMD21 or SAMD51 used with the Adafruit Trinket M0 and ItsyBitsy M4 can be programmed using MicroPython or CircuitPython.
For details of how to get started with these environments, here are some links.
Note that in many cases though, I’ll be sticking with the Arduino environment even for these more powerful boards.
Using the Wemos D1 and the Arduino Environment
I like the Wemos D1 Mini as its small and has a range of interesting add-ons all in a small package. It also has built-in Wifi which presents some interesting possibilities.
However to use the Wemos D1 Mini with the official Arduino IDE requires a couple of extra steps. The Arduino IDE must first be told how to talk to the board, so a number of support packages must first be installed as per the instructions under “Installing with Board Manager” here: https://github.com/esp8266/Arduino.
Then the Wemos D1 Mini should come up as an option to choose alongside Arduino Uno and the others.
Getting Started with Analog Synths
If you want to get going with proper analog synthesis there are many options. Some initial things to consider:
- How DIY? From kits? From basic components?
- Are you thinking “proper” analog from components, opamps and so on; or “pseudo analog” using microcontrollers?
- Do you want an all-in-one thing or getting into modular synths (expensive)?
As you’ve probably seen I do a lot of pseudo-analog – in that I use microconrollers to simulate analog principles. In my view that is more beginner friendly in that the electronics side of things is much smaller.
I’d strongly recommend never mixing and matching expensive commercial modular synths with DIY as the risk of causing expensive damage is pretty high
If you want microcontroller-pseudo analog, then the makes of HAGIWO are pretty good and cheap.
If you want electronics proper analog, then “Modular in a Week” by Kristian Blasol.
If you want easy dimensions and no-nonsense modular systems, look at Look Mum No Computer’s Kosmo synthesizer – modules, guides, forums.
The canonical reference, but isn’t very beginner friendly, is Ray Wilson’s Music from Outer Space site. if you see someone mention MFOS that is probably what they are referring to.
One of these “all in one” desktop systems might be a useful way to get started, it depends how much you already know about analog synthesis? I quite like my Korg Volca Keys and Modular, for example for simple messing about.
Make’s “Analog Synthesizers” book (mentioned above) is pretty good at covering all the basics.
The documentation I’ve put together for my Educational DIY Synth Thing might be a quick introduction too: https://github.com/diyelectromusic/ESP32EduModHackThing/tree/main/Docs
There are a number of software Audio and MIDI Frameworks that are pseudo-analog-like that allow you to “patch” in code rather than electronics. For Arduino that usually means Mozzi. ESP32 has its own audio framework. vTeensy has another with a neat graphical programming tool (that I’ve not used).
And you can get quite far with things like Max MSP or Pure Data apparently (again that I’ve not used) on the DAW/software side…
If going modular then you’ll need a case and power but something like my CakeBox 30HP EuroRack Lid might help get you started…
Kevin
