I quite like many of the XIAO boards, so when I got an email announcing the XIAO MIDI Synthesizer I went off to buy one and take a look.
This uses the Dream SAM2695 MIDI device, which is a General MIDI instrument in a chip. I have a couple of devices that use this chip, so at some point I’ll talk about some of them too.
- Part 1 – Getting started and getting code running.
- Part 2 – Swapping the ESP32-C3 for a SAMD21 to get USB MIDI.
- Part 3 – Taking a deeper look at the SAM2695 itself.
- Part 4 – A USB MIDI Synth Module using the SAMD21 again as a USB MIDI Host.
- Part 5 – A Serial MIDI Synth Module using the original ESP32-C3.
- Part 6 – Pairs the Synth with a XIAO Expansion board to add display and potentiometers.
Warning! I strongly recommend using old or second hand equipment for your experiments. I am not responsible for any damage to expensive instruments!
These are the key Arduino tutorials for the main concepts used in this project:
If you are new to microcontrollers, see the Getting Started pages.
Parts list and Circuit
- XIAO MIDI Synthesizer
- USB-C for power and programming
Er, and that’s essentially it – it has a built-in speaker. But you can use a 3.5mm stereo TRS to connect to an external amplifier or headphones if you wish too.
XIAO MIDI Synthesizer
This device pulls together the following into a single package:
- XIAO ESP32-C3
- Dream SAM2695
- Audio amplifier and speaker
- Buttons
- Grove interface
The XIAO GPIO headers are accessible through the 3D printed case, but the Grove connector is not.
As soon as power is supplied via the USB-C connection, with the default firmware it is possible to do the following:
- Start or stop a rhythm.
- Select through each of the 128 voices, playing a single note to hear each of them.
- Adjust the tempo for the rhythm.
- Adjust the note to test the voices.
- Enter a “four track” mode that plays a fixed, four track pattern.
The hardware architecture is described in the published schematics here: https://wiki.seeedstudio.com/xiao_midi_synthesizer/

The XIAO is connected to the SAM2695 using the UART and drives it over MIDI. It also supports 4 buttons on GPIO pins and the aforementioned Grove connector, which also appears to be connected to the same MIDI link.
Here is a simplified schematic of the main XIAO connections I’m interested in.

One thing I hadn’t realised was that the GPIO pins connected to the buttons is different depending on which board I’m using, although some of the Arduino cores used by the XIAO might have D0, D1, D2, D3 defined to be used.
Here are the relevant GPIO Pins for the buttons:
| XIAO ESP32-C3 | XIAO SAMD21 | |
| D0 | 2 | 0 |
| D1 | 3 | 1 |
| D2 | 4 | 2 |
| D3 | 5 | 3 |
Presumably the idea is that if the XIAO isn’t being used, then the Grove connector will allow something else to drive the synth over MIDI instead and also power the unit via 5V.

Running Bespoke Code
Unfortunately, at one point (after pressing the “preset” button too quickly I think) I managed to get the whole thing locked up and even a power cycle didn’t seem to wake it up again.
Although eventually it did seem to wake up again (I wonder if I’d managed to get the XIAO loose in its socket inside the enclosure), I never-the-less decided it would be interesting to get some code loaded onto the thing.
The default firmware appears to be this sample application: https://github.com/Seeed-Studio/Seeed_Arduino_MIDIMaster/blob/main/examples/StateMachine/StateMachine.ino
So as I already had the ESP32 Arduino core installed, I just re-downloaded that sketch and got it going again by doing the following:
- Downloading the ZIP of the above GitHub project, extracting it and copying it to the Arduino libraries folder.
- Set up the Arduino environment for the XIAO ESP32-C3 as described here: https://wiki.seeedstudio.com/XIAO_ESP32C3_Getting_Started/
- Select the board: Tools -> Board -> esp32 -> XIAO_ESP32C3
- Select File -> Examples -> Seeed_Arduino_MIDIMaster -> StateMachine
I also tried the most basic example: Seeed_Arduino_MIDIMaster -> basic which just sets the synth to Voice 1 (Piano) and plays a note every second.
The Code
One thing I thought it would do “out of the box” is act as a MIDI device over USB, but that doesn’t seem to be the case. From what I can make out, MIDI USB for ESP32 devices has to use the Adafruit TinyUSB Library, which apparently isn’t available for the ESP32-C3 as it doesn’t have a native USB device controller (I think I knew that from previous experiments?).
So I have a few options:
- Use something like Hairless MIDI on a PC to direct MIDI to a USB serial port, which is how the XIAO presents itself, and then get the XIAO to relay everything over to the Dream synth.
- Use the XIAO RX pin to connect to a 3V3 serial MIDI interface and relay MIDI that way.
- Replace the XIAO C3 with something else that supports USB MIDI, like the XIAOs based on the RP2040, SAMD21, or the ESP32-S3.
By far the simplest for me at this point is to use an external 3V3 compatible MIDI module on the RX pin.
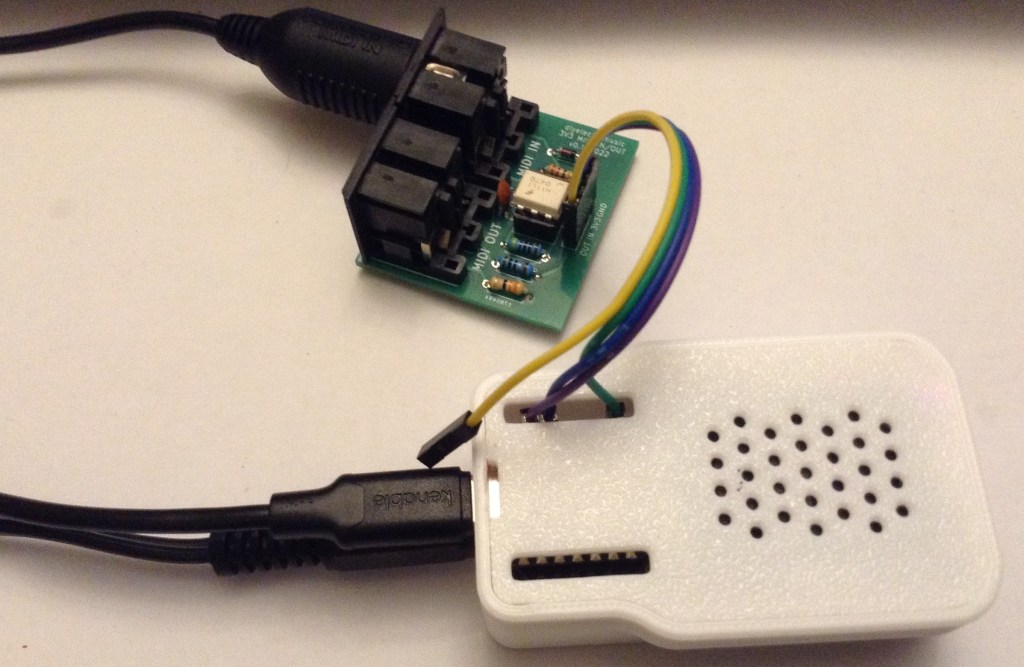
The connections for that right hand set of header pins are as follows:
- 5V – not used
- GND – MIDI module GND
- 3V3 – MIDI module VCC
- D10 – not used
- D9 – not used
- D8 – not used
- D7/RX – MIDI module MIDI IN/RX
None of the pins on the left hand set of headers are required.
The code for relaying MIDI from the RX pin to the TX pin is pretty trivial, as the Arduino MIDI Library has a built-in THRU function for serial MIDI.
#include <MIDI.h>

MIDI_CREATE_INSTANCE(HardwareSerial, Serial0, MIDI);

void setup() {
  MIDI.begin(MIDI_CHANNEL_OMNI);
}

void loop() {
  MIDI.read();
}
But really, at this point the ESP32-C3 is essentially superfluous as I could almost certainly wire up the MIDI interface to the Grove socket and drive the Dream synth directly.
But it shows that the following can be done:
- Hook up external Serial MIDI.
- Load custom code onto the device.
- Use the SAM2695 as a programmable General MIDI sound device.
Closing Thoughts
This seems like it will be quite a fun module to have a proper play with. The demo application is ok, but it doesn’t really show-off the potential of the device in my view.
It’s a shame that the chosen microcontroller can’t act as a USB MIDI device. That would really allow the device to shine. Given that, I’m not sure that this can really be described as “plug-and-play functionality, you can dive straight into music creation—no complex setup required” as per the product page. You can’t really unless you know how to get bespoke code running, unless I’m missing something.
But as has already been seen, there is an awful lot of potential here. The buttons and built-in amp and speaker could make for a really nicely contained Synth unit. My only slight concern is how much the 3D printed case will cope with me keeping taking the back on and off to get at the boot/reset buttons inside.
The video is my usual “go to” for trying out a synth module – a MIDI file from the Internet of an extract of Stravinsky’s Rite of Spring. This is using the external audio connector to go out into a small speaker.
It doesn’t sound bad at all for such a neat little unit!
Kevin
