I had a query about using one of the common Arduino MIDI Shields with an ESP32 and when I looked into it, this is where I got to.

Warning! I strongly recommend using old or second hand equipment for your experiments. I am not responsible for any damage to expensive instruments!
If you are new to Arduino, see the Getting Started pages.
Parts list
- Arduino Uno MIDI Shield
- ESP32 or other 3V3 microcontroller
- 1x 22KΩ, 1x 33KΩ resistors for MIDI IN
- 1x 10Ω, 1×30Ω resistors for MIDI OUT
- Breadboard and jumper wires
Arduino MIDI Shield

These shields are available very cheaply and designed to plug directly onto an Arduino Uno. They are a variation of an original Olimex open source design (details here) but details of the specifics of this shield seem pretty sparse. But it isn’t too complex to figure out.
Essentially it is a 6N139-based 5V MIDI IN circuit and a non-buffered 5V MIDI OUT and THRU. The boards include a switch to cut off RX from MIDI to allow for sketch uploading. There is often a footprint for a button for RESET which may or may not be populated, and there is a block of breakout connectors for all the Arduino’s IO pins.
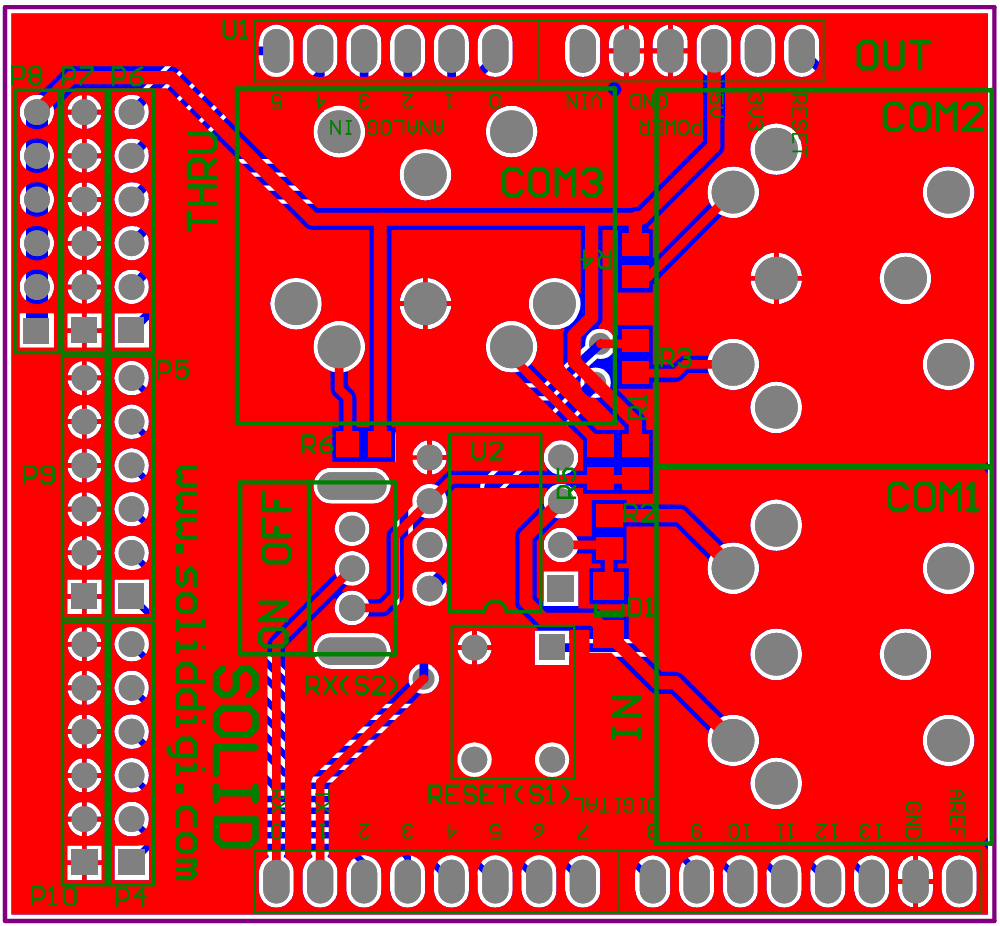
I did eventually happen upon an uncredited schematic in a random online cloud service file storage, so I’ve copied it over here.

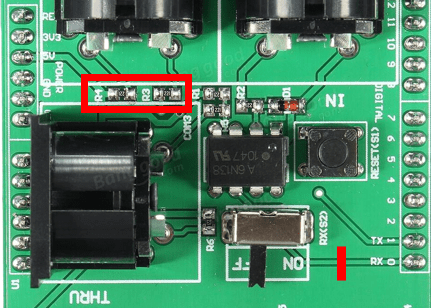
And mapping this over to the board itself I found this PCB diagram. Note this has a URL for “soliddigi” on it, but that doesn’t seem to exist (or do anything) that I could see.
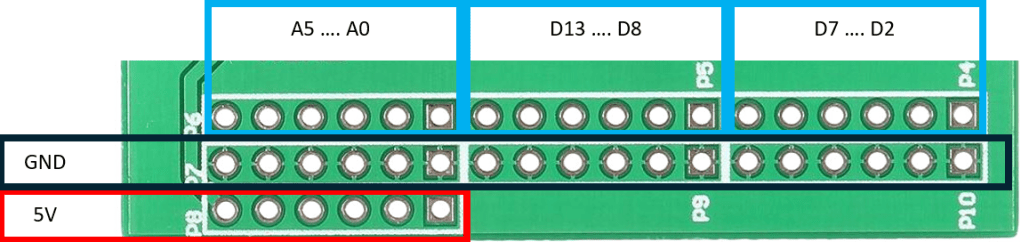
But whilst on the topic of this board, we can map out the IO pin breakouts for future reference too by simply examining the underside of the board:
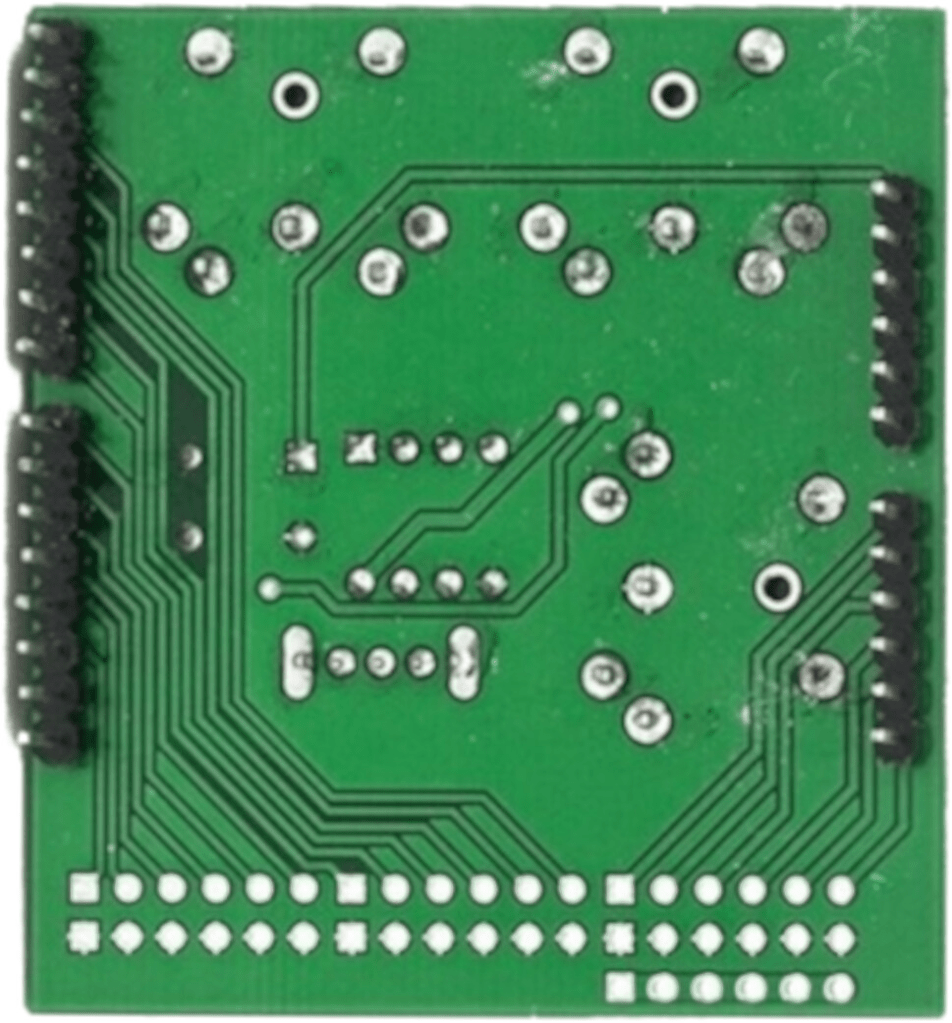
From this we can see the following pinouts for the board.
Anyway, back to MIDI…
Converting MIDI IN
The output (to the Arduino) from the MIDI IN circuit of this board is a UART RX connection pulled high to 5V. The easiest way to drop that to 3V3 for use with a 3V3 logic system is to use a resistor divider as shown below.
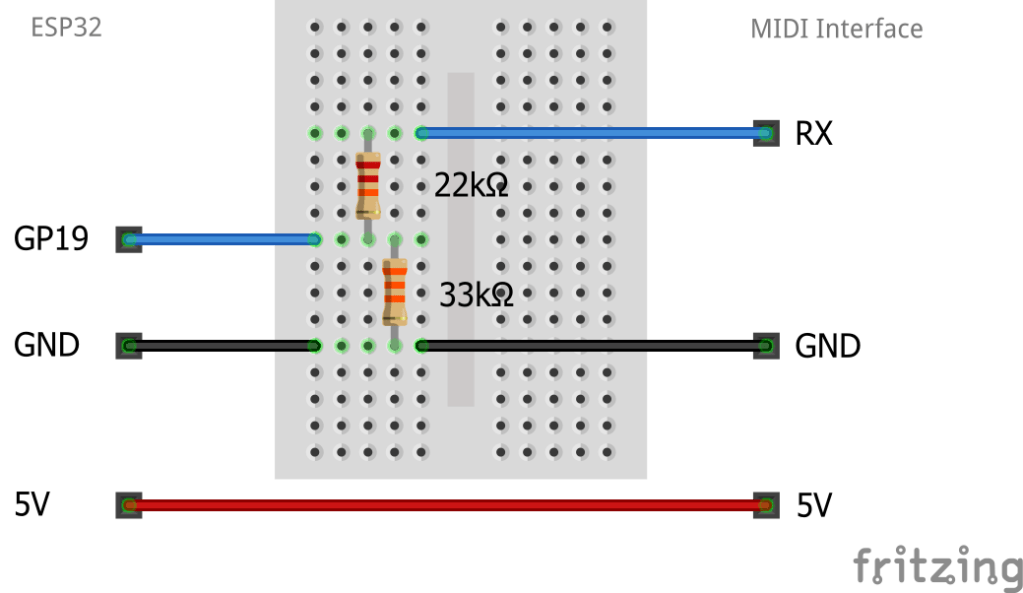
The MIDI shield will still need to be powered by 5V but the output from the RX pin will now be dropped by the ratio 33K/(22K+33K) which is approximately 0.6. So 5V x 0.6 = 3V.
The choice of resistor for this specific application is relatively arbitrary as it is the ratio that is important, but it should be remembered that this is connecting both the optoisolator’s output (RX) and the microcontrollers IO pin (GP19 above) to GND so there will be limits on the amount of current that can be sourced from the two IO pins and that can be sunk into GND.
Converting MIDI OUT
Converting MIDI OUT isn’t quite so easy unfortunately. If the MIDI interface had included a buffer, like the 74HCT14 I’ve used in the past, then no conversion would be necessary – a 3V3 logic signal can drive that directly and the output would be a 5V signal to the rest of the MIDI circuit.
But it doesn’t – it is a directly connected 5V-expecting MIDI OUT circuit involving two 220Ω resistors. If this is driven from a 3V3 level then it is unlikely that there would be enough current to drive the optoisolator at the other end of the MIDI link.
The basic calculation goes as follows (see my MIDI Connections Cheat Sheet for details of the circuits) – this assumes one 220Ω resistor on the receiving side and two on the sending side as per the MIDI spec, and a typical 1.7V drop across the optoisolator.
For 5V operation, from Ohm’s law: Current = (5 – 1.7) / (220+220+200) = 5mA
For 3V3 operation: Current = (3.3 – 1.7) / (220+220+200) = 2mA
This is why the MIDI spec recommends 10Ω and 30Ω resistors for a 3V3 logic OUT circuit:
For proper 3V3 operation: Current = (3.3 – 1.7) / (220+30+10) = 6mA
Really, the easiest method, assuming the MIDI connectors/hardware are required to be used “as is” would be to include a 74HCT14 (the HCT variant, not the HC version) as a buffer by passing the 3V3 signal through two of the inverters.
But at this point, as this is just a couple of resistors, I’d probably look to remove the two 220Ω resistors in the OUTPUT circuit and attempt to patch in a 10Ω and 30Ω instead with the 30Ω pulling up to 3V3 rather than 5V.
Patching the Shield
Given all the above, I believe it is possible to patch this shield to support 3V3 logic operation by performing the following:
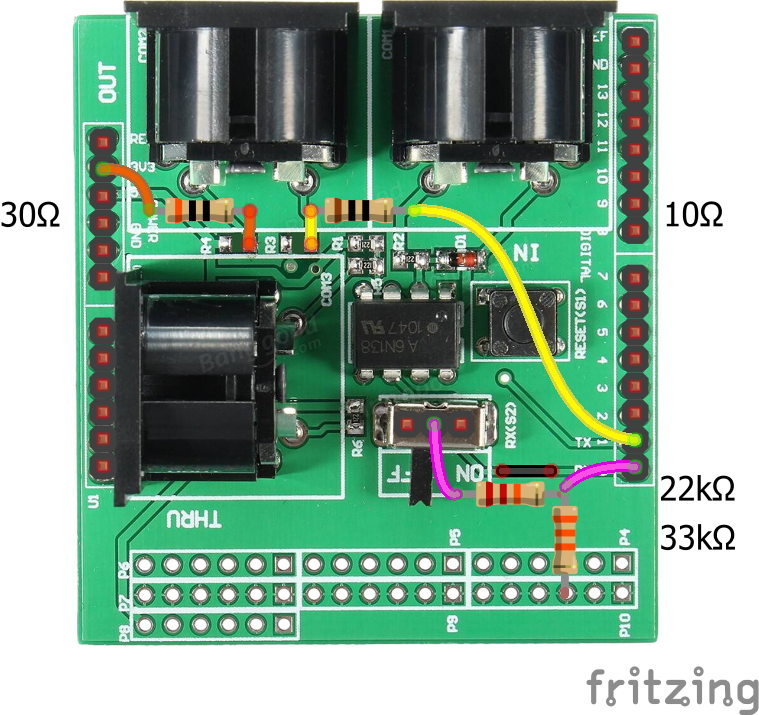
- Remove R3 and R4.
- Cut the track to the RX Pin.
- Add 10Ω between MIDI OUT R3 connector and TX.
- Add 33Ω between MIDI OUT R4 connector and 3V3.
- Add 22KΩ between RX and the centre pin of the ON/OFF switch (check this with a meter though – it was the middle pin for me!).
- Add 33KΩ between RX and GND.
WARNING: All of this is theoretical. I’ve not actually done it myself.
Step 1: Remove R3, R4, cut RX track.
Step 2: Add resistors.
Note: I don’t believe that anything has to be done to the THRU as it is taken directly off the RX side of the 6N139, so that will continue to work (as I understand things) off the 5V circuit directly.
Closing Thoughts
Given the number of off-the-shelf 3V3 MIDI boards now available, I suspect in most cases acquiring one directly would be the better option to the above.
But having said that, these boards are available so cheaply and widely that it is worth considering. Also, there are 3V3 logic level boards in Uno form factor, so having a 3V3 version of the shield would be useful in any case.
But I repeat, other than testing the resistor divider on RX, I’ve not tested any of the modifications to the board itself. Do let me know if you’re brave enough to give it a go 🙂
At some point I might make my own 3V3 Uno format shield PCB…
Kevin

I think this maybe a simpler solution, similar to this schematic here;
https://www.olimex.com/Products/Duino/Shields/SHIELD-MIDI/resources/SHIELD-MIDI-sch.pdf
Looks like just the MIDI IN resistor just needs to change closer to 100ohms, you can just put a 220ohm resistor soldered to MIDI IN socket PIN 5 to PIN 2 on 6N138 (on the underside of the board is easy), so the resistor would be in parallel to existing 220ohm SMD resistor, so it would make it 110ohms in parallel, should be enough current to drive the optocoupler LED okay at 3.3V. If you are not using as a Arduino shield in an Arduino, connecting the 3.3V to the 5V pin on the shield would supply 3.3V to the optocoupler/circuit, the RXD would be at 3.3V already, so voltage divider is not necessary. Hope this makes sense. Like yourself I have not done myself, but I will try it soon.
LikeLike
If you mean R8 in that schematic, I’m not sure that’s within the MIDI spec. That part of the MIDI IN circuit is actually part of the senders MIDI current loop, so is independent of the voltage of the receiver’s circuit. Normally as long as the required 5mA is produced, then it is all to MIDI spec, so I’m not sure how they get away with using a 100R resistor instead. For a traditional 5V sender, that probably means just 6mA rather than 5mA, but if the sender is a 3V3 MIDI circuit (using 10R and 33R resistors as per the 3V3 version of the spec) then that could be as much as 11mA instead of 5mA, which the sender would probably not be expecting…
Kevin
LikeLike
I had a rethink about that resistor, that should not make a difference like you said. I just tried it without any board modification and just fed 3.3V to the 5V pin on the midi shield board and it worked fine from a Pi Pico. I could send and receive data fine. The RX pin should only get 3.3V max, so it would be safe for the 3.3V input on the microcontroller. Even easier. I know it maybe not in spec, I found your article later from 2021. Worth a try, good chance it will just work.
LikeLike
I’ve seen people use 6N138 and 6N139 optoisolators for 3V3 circuits and I believe some may work. But as I recall, it depends on the optoisolator, and possible even the manufacturing run of that particular part, as (I forget the exact maths) running them at 3V3 means the logic levels are now out of spec for the part. So it might be fine, or it might not work at all, or in some cases it might mostly work with the odd glitch.
That was my understanding anyway. Maybe I should add that to the post and people can try it for themselves and see if their specific board works or not 🙂
Kevin
LikeLiked by 1 person