Following on from my ESP32C3 OLED Mini MIDI Montor and Waveshare Zero, Pimoroni Tiny, and Neopixels this project uses a Waveshare RP2040 mini Matrix display. This is largely the same pinout as the other Waveshare boards, but includes a 5×5 programmable LED (i.e. neopixel-like) matrix.
Warning! I strongly recommend using old or second hand equipment for your experiments. I am not responsible for any damage to expensive instruments!
If you are new to microconrtollers, see the Getting Started pages.
Parts list
- Waveshare RP2040 Matrix
- Optional: MIDI interface
- Optional: Breadboard and jumper wires
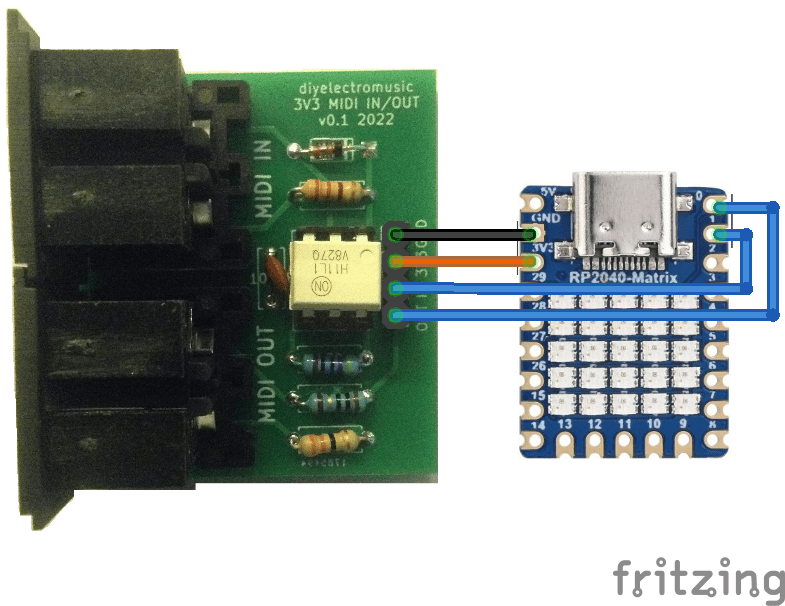
The Circuit
If used with USB MIDI, then all that is required is to plug the RP2040 Matrix into a computer and it will be able to come up as a USB MIDI device called “CircuitPython Audio”.
If serial MIDI is required, then a Ready-Made MIDI Module supporting 3V3 operation is needed and can be connected to TX/RX on GPIO 0 and GPIO 1 as well as 3V3 and GND.
The Code
I’m using Circuitpython for this one. It uses the same version of Circuitpython as the Waveshare RP2040 Zero – details here. It requires the following libraries to be installed:
- /lib/adafruit_midi/*
- /lib/neopixel
- /lib/adafruit_pixelbuf
The string of Neopixels is hooked up to GPIO16, so can be initialised as follows:
pixel_pin = board.GP16
num_pixels = 25

pixels = neopixel.NeoPixel(pixel_pin, num_pixels, brightness=0.1, auto_write=False, pixel_order=neopixel.RGB)
I’m using the Adafruit MIDI library to pull out NoteOn and NoteOff events and using those to set certain LEDs.
The code can run off USB MIDI or serial MIDI:
# Serial MIDI
uart = busio.UART(tx=board.TX, rx=board.RX, baudrate=31250, timeout=0.001)
midi = adafruit_midi.MIDI(midi_in=uart)

--------

# USB MIDI
midi = adafruit_midi.MIDI(midi_in=usb_midi.ports[0])
As there are only 25 LEDs I set a range of MIDI notes to respond to at the start.
MIN_NOTE=48       # MIDI Note C3
MAX_NOTE=(48+25-1)  # MIDI Note C#5
The main loop just cycles around checking for MIDI events and updating the LEDs.
while True:
    msg = midi.receive()
    if (msg is not None):
        if (isinstance(msg, NoteOn)):
            if (msg.note >= MIN_NOTE and msg.note <= MAX_NOTE):
                pixels[midi2pix(msg.note)] = GREEN;

        if (isinstance(msg, NoteOff)):
            if (msg.note >= MIN_NOTE and msg.note <= MAX_NOTE):
                pixels[midi2pix(msg.note)] = OFF;

    pixels.show()
The Neopixel strip is scanned and MIDI is checked every time through the loop, but the display only changes if a NoteOn or NoteOff is received.
In terms of mapping notes to the LEDs, I’m keeping it simple and just using the LEDS in the string order they are already arranged.
This does however mean one compromise – I either go top-left to bottom-right; or bottom-right to top-left. That is because of the ordering of the matrix. There is more here: https://thepihut.com/blogs/raspberry-pi-tutorials/coding-the-waveshare-rp2040-matrix
Ideally, I’d go bottom-left to top-right, but that would mean some fancier mapping of position to note that I’m not bothered about doing at this stage.
Closing Thoughts
At some point I’ll be able to resist a neat, small display, but today is not that day. And it is doubly hard when it is a small LED matrix.
This is a fun little board and I’m chewing over a few other ideas now I’ve got the basics out of the way.
Kevin
