I’ve been dabbling for a while with USB MIDI on an Arduino, but I’ve never really walked through all the options available or pulled together in a single place all the projects I have, so this post looks at all that in a bit more detail.
Warning! I strongly recommend using old or second hand equipment for your experiments. I am not responsible for any damage to expensive instruments!
If you are new to Arduino, see the Getting Started pages.
Background: MIDI and USB
Serial MIDI connections have a direction. You connect a MIDI OUT on one device to the MIDI IN on another and then you have the possibility of sending up to 16 channels of information between them.
USB is slightly different. If you have a single USB MIDI connection it can support a bi-directional interface – i.e. both ends have a “virtual MIDI OUT and virtual MIDI IN” and it is taken for granted that you can send data both ways. This is a huge simplification on what is actually happening which involves “end-points” in addition to channels, and several “multiplexed” connections over each physical cable, but it will do for now.
But USB is also a “directional” bus. It has hosts and devices. Many devices will connect to a host and the host will be responsible for essentially being “in charge” of the bus. But both host and devices, in MIDI terms, support both IN and OUT ports.
You can read more about USB MIDI here: https://www.midi.org/midi-articles/basic-of-usb
In almost all cases a computer will be regarded as the “host” and you will plug USB MIDI devices into it. Almost all MIDI keyboards and controllers will be USB MIDI devices if they support USB MIDI. Some keyboards have a “to host” and a “to device” USB port. Often the “to host” allows it be be a MIDI USB device to be plugged into a computer; whereas the “to device” link often allows you to plug in a USB memory stick for recording or data storage.
But you can’t plug a USB device into another USB device without a USB host. This is why you can’t just simply plug your USB MIDI controller into a USB MIDI synth unless it includes a USB MIDI host port itself. Confused? So am I!
When you add a microcontroller into the mix things get even more interesting as there are many different options to make them act as USB devices or USB hosts. And in some special cases you can make it act as both a USB host and USB device; as two USB hosts (thus enabling two other USB devices to talk to each other); or as an interface between USB MIDI and serial MIDI.
Here are some of the projects that have already enabled some of this so far:
- USB MIDI Device to MIDI serial:
- PC USB to DIN MIDI IN – Arduino Leonardo compatible mini-USB to serial MIDI DIN interface.
- PC USB to Arduino Serial MIDI – Arduino Leonardo compatible mini-USB to Arduino serial interface.
- PC USB to Arduino Serial MIDI – Part 2 – Pro Micro MIDI device “co-processor” on a shield for an Arduino Uno
- PC USB-MIDI to MIDI Revisited – Pro Micro to serial MIDI module.
- Arduino USB MIDI VS1053 Synth – Hobbytronics “off the shelf” USB device to serial module for use with Arduino.
- CircuitPython USB to Serial MIDI Router – This shows how to use a CircuitPython device to do the same.
- XIAO Pi USB MIDI Device PCB – PCB to add a XIAO MIDI device to a Raspberry Pi.
- XIAO USB Device to Serial MIDI Converter – an alternative USB MIDI device to serial converter.
- USB MIDI Host to MIDI serial:
- Simple USB-MIDI to MIDI – Arduino Uno with off-the-shelf USB host and MIDI shields.
- USBMIDI to MIDI Shield – Arduino Pro Mini with mini USB host shield “co-processor” for an Arduino Uno.
- Mini USB-MIDI to MIDI – Arduino Pro Mini with mini USB host shield.
- USB-MIDI to MIDI Revisited – Adafruit Trinket M0
- Arduino Pro Mini MIDI USB HOST PCB Design – PCB supporting Arduino Pro Mini or Trinket M0
- Arduino Pro Mini USB Host Proto PCB Design – a similar board to the previous one but with a prototyping area.
- Arduino Pro Mini MIDI USB CV PCB Design – USB MIDI to Korg Volca compatible CV/Gate PCB.
- USB MIDI to Serial and CV/GATE – Example application using the above PCB.
- Multi-mode USB host and device MIDI to MIDI serial:
There are two things to notice about the above projects:
- To act as a USB MIDI device requires built-in USB support for the Arduino, in most cases requiring on the use of an ATmega32U4 on an “Arduino Leonardo compatible” type board (rather than the ATmega328 on the Uno or Nano style board).
- To act as a USB MIDI host requires either additional hardware, for example a USB host shield for the Arduino (there are versions for both the Uno and Pro Mini); or often a more powerful processor, such as the 32-bit SAMD processor used on the Trinket M0 or Arduino Due.
There are options however to convert a “traditional” non-native USB Arduino, such as the Uno, into something that can talk “USB MIDI”. That is what will be explored further in this post.
Serial MIDI over USB
The Arduino Uno, Nano and similar boards have a special “co-processor” to handle the USB interface. This is connected internally to the main microcontroller’s serial port (UART0 for the ATmega328). When using an Arduino for serial MIDI, the same serial port is repurposed for the MIDI link by connecting D0 and D1 to a MIDI interface. At this point, the serial link over USB is no longer functional.
But it is possible to redirect MIDI over the USB link. At the end of the day, the USB link is just a “virtual serial port” and MIDI only needs a serial port to function.
This has the following advantages:
- It is pretty simple, and other than changing to a more “PC friendly” baud rate, requires very minimal changes to your Arduino code.
- You can use faster baud rates than the standard MIDI 31250.
There is a downside however:
- When plugged into a PC, the PC will still see the Arduino as a serial port, not as a MIDI device. This means a “routing” application is required to treat the USB serial port as a MIDI port. The “Hairless” MIDI to Serial bridge will do just that and is available from: https://projectgus.github.io/hairless-midiserial/
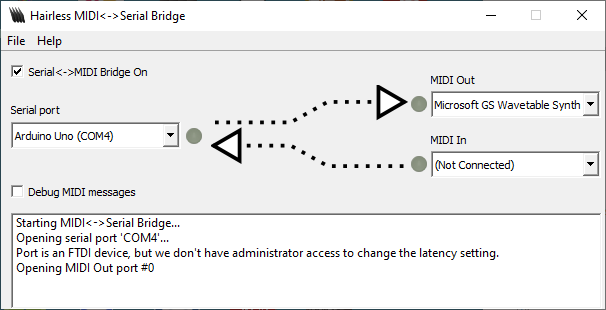
- PC serial ports don’t typically support the standard MIDI baud rate of 31250, so more “PC friendly” bauds are required, such as 38400, 57600 or even higher have to be used.
- You still can’t use the Arduino serial port for debugging.
This is what code doing this would look like
#include <MIDI.h>
MIDI_CREATE_DEFAULT_INSTANCE();

void setup() {
  MIDI.begin(MIDI_CHANNEL_OMNI);
  Serial.begin (38400); // Reprogramme the Serial baud rate
}

void loop() {
  MIDI.sendNoteOn (60, 64, 1);
  delay(500);
  MIDI.sendNoteOff(60, 0, 1);
  delay(500);
}
Once the MIDI code has been initialised, using MIDI.begin() then the serial baud rate is changed using Serial.begin(), but otherwise everything else is just used as before.
Reprogramming the Arduino’s USB Firmware
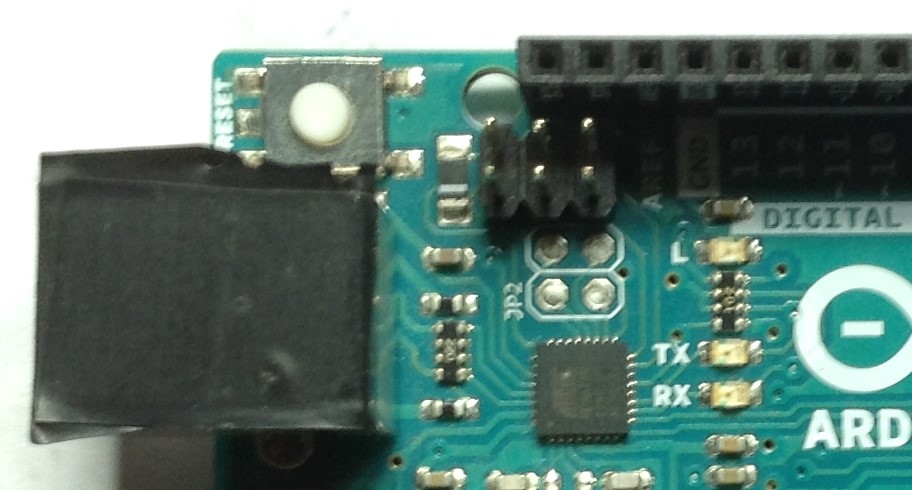
On the face of it that sounds like a really scary thing to be doing, but in reality it is quite straight forward, providing you have an Arduino board that utilises the ATmega16U2 as the USB interface. But not all Arduino’s do! Here are six variants on the Arduino Uno design that I happen to have in my parts box. The top three all use the ATmega16U2 for the USB link, but the bottom three all use something else, usually a CH340 chip.

So how can you tell? Well I believe any official Uno R3 uses the ATmega16U2 (I think R1 and R2 used an ATmega8U2). It looks like those boards using a DIP version of the ATmega328 main MCU do too, but I can’t be conclusive.
The key indicators are the smaller, square, surface mount chip near the USB link and the provision of a second set of ICSP programming headers alongside it. If you can read the markings it will say Atmel ATmega32U2. If you have a rectangular, 16-pin, surface mount chip it is probably something else (some pre-Uno Arduinos used an FTDI chip, but many copies these days use the CH340). You can see the difference between my official Uno R3 and a clone using the CH340 below.

I don’t know the full situation with an Arduino Nano. My official Nano has an FDTI chip and my clones have the CH340, so I can’t do this with either of those, but there may be different versions out there…
The basic idea is that the 16U2 can be given code to make it appear as a class compliant USB MIDI device instead of a serial port.
I used mocoLufa from here: https://github.com/kuwatay/mocolufa. The great thing about this code is that you can boot the 16U2 back into serial mode with a jumper setting which allows you to keep programming the Arduino as normal. Without this, you’d have to program the Arduino using its ICSP header rather than USB.
The mocoLufa project is based on the LUFA project (Light-weight USB Framework for AVRs) and if you have the right tools (which isn’t the Arduino IDE!) then you can build it from source code for the ATmega16U2 directly yourself. But that isn’t necessary as the project provides a built firmware image as a “hex” file which can be downloaded.
The instructions are provided in the above GitHub project, and there are more general instructions on programming the 16U2 here:
But just to be clear, this is what I had to do:
- Download the Flip application from Atmel/Microchip here: https://www.microchip.com/en-us/development-tool/flip – I used the one with the Java run-time environment included.
- Download the 16U2 “dualMoco.hex” file from the HEX subfolder of the above GitHub repository.
- Boot the Arduino’s 16U2 into “DFU” mode (“Device Firmware Update”) which allows you to update the firmware. To do that you have to briefly short the following two pins on the ICSP header:

Then you can run the Flip application and do the following:
- File -> Load HEX File -> select the above file.
- Device -> Select -> find ATmega16U2.
- Settings -> Connection -> USB -> Open.

Then you can hit “run” to perform the Erase -> Program -> Verify cycle and hopefully load the new code. Then on power cycling it should come up and be recognised by a computer as a “mocoLufa” MIDI device.
The mocoLufa code will all you to boot the Arduino back into serial mode to allow it to be programmed as usual from the Arduino environment. You need to connect pin 4 (MOSI/PB2) and pin 6 (GND) on the ICSP header for the 16U2 as follows and then power up the board:

Once the Arduino is programmed, then this jumper can be removed and the board power cycled again and it will now act as a serial to MIDI bridge once again.
To use MIDI the code can just access the MIDI port as if it was a normal UART/Serial MIDI port.
#include <MIDI.h>

MIDI_CREATE_DEFAULT_INSTANCE();

void setup() {
  pinMode(LED_BUILTIN, OUTPUT);
  MIDI.begin(MIDI_CHANNEL_OMNI);
}

void loop( {
  if (MIDI.read()) {
    digitalWrite(LED_BUILTIN, HIGH);
    delay(500);
    digitalWrite(LED_BUILTIN, LOW);
  }
}
Arduino “Soft” USB
One other option for devices with no built-in USB port is to use “software USB”. One implementation is VUSB from ‘Objective Development’: https://www.obdev.at/products/vusb/index.html
This is a software USB stack that is released under the GPL but can also be licensed commercially if required. It gives an example circuit to turn two of an AVR’s IO pins into a USB 1.1 compliant, low-speed USB port.
One advantage of this approach, is that it should work with any Arduino, not just those with the ATmega16U2. The disadvantage (I’m guessing) is that all the processing has to be done in software, but then the same could be said for all the applications using the USB Host Shield too.
I’ve not tried this myself as to be honest, I have no real need for it. But if you’ve used it and done something musically interesting with it, do let me know in the comments!
Closing Thoughts
Over the last couple of years I’ve had a number of USB MIDI related posts scattered here and there on the blog, so it was about time to bring them together. I have also been wanting to try the 16U2 USB MIDI trick for a while too, so it is fitting to be able to do that all at once.
In general, I was really surprised at how relatively simple it was to upgrade the 16U2. I’d at least expected to have to break out a ICSP programmer connection, but no – booting into DFU mode and programming over USB itself made the process very straight forward. I was also anticipating it being a bit more “all or nothing” but again having a jumper option to allow the Arduino to be programmed as normal is great!
Many thanks to all the developers of the various bits and pieces (LUFA, mocoLufa, Flip, etc) that made all this possible so effortlessly!
Kevin

Thanks for this explanation. Just one confirmation – with the new firmware & jumper I can program as usual, just remove the jumper so I can reboot the arduino to send midi via USB?
I primarily use midi over usb, so I have used a Nano, Due, and Leonardo. However I have one project that uses a Mega as I send midi via serial to control my amp. But I have an extra UNO and want to create another midi keyboard controller.
LikeLike
Yes, the jumper on the secondary ICSP port on the Uno tells the new firmware to run in “passthrough serial” mode not in “USB MIDI serial” mode.
Kevin
LikeLike
Any advice on the order of operations?
I am booting the Arduino Uno as described above, opening the Flip application, loading the hex file, selecting the device, but when I select Coms – USB, the app locks up and I can’t do anything else. Maybe I’m not doing it in the correct order? Thanks!
LikeLike
It’s been a while since I tried it, but I don’t remember anything special about the sequence. Do you definitely have one of the Arduinos with a ATmega16U2 USB/serial interface? Many of the clones don’t (I found out!)
LikeLike