I was given a JQ6500 MP3 Player Module to play with so I immediate saw the potential here to repeat my MCP4725 Sample Player experiment.
- In the next part, I add MIDI control.
The JQ6500 module is designed to be the basis of a simple MP3 player, supporting the following features:
- Mono or stereo MP3 playback.
- A simple control interface to support volume, file “hot key” playing, play/pause and so on.
- A 3W audio output that can drive a small speaker directly.
- A direct audio output that can be linked to a line out or headphones.
- A serial protocol to support more advanced features such as audio effects.
- A micro USB port for MP3 uploading.
The only downside is that you need to run a special (Windows) application to get files onto the thing, and that application by default is all in Chinese! Still it has a neat feature whereby when you first plug it in it looks like a CD drive and you can run the application directly from that without having to install anything.
There is a version that supports a SD card, but I have the version with built-in memory. Mine includes 16Mbit of flash, which amounts to 2 MB of storage. That doesn’t sound like much in terms of MP3 music, but for sound effects, compared to my MCP4725 that only had the Arduino’s memory, that is huge!
My board looks like this one.

These are the key Arduino tutorials for the main concepts used in this project:
If you are new to Arduino, see the Getting Started pages.
Parts list
- Arduino Uno
- JQ6500 MP3 Player Module (or “JQ6500 Voice Sound Module)
- 8 ohm speaker or old headphone speaker
- 1x 1kΩ resistor
- Breadboard and jumper wires
The Circuit
You don’t need an Arduino to test the module. If you have a 5V power supply handy you can connect it up, add in your speaker (I’ve used an old headphone speaker) and simply connect a wire from GND to one of K1 to K5 to “trigger” the MP3 file.
If you have five files downloaded then the keys will play each of the files I believe (I only tried it with one). So for a simple sound effects unit that might be all you need.
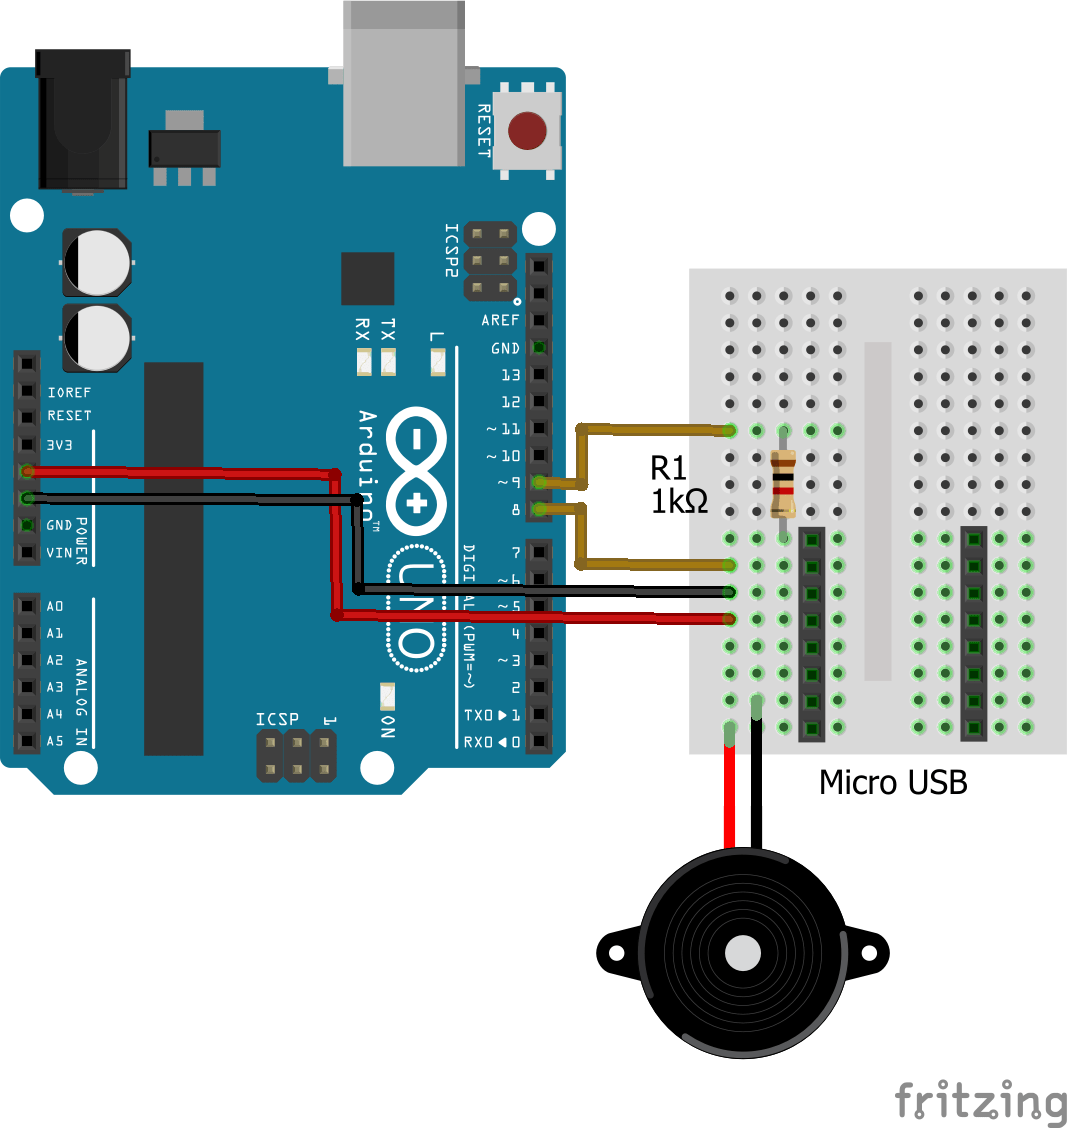
But I wanted to try out the Arduino control, so I put together the circuit as shown above. The MP3 module is a 3.3V logic module, so you can’t connect it directly to the Arduino’s IO pins, but it is fine to be powered from the Arduino’s 5V power line.
The link to the Arduino is via a serial protocol so we could hook it up to the RX/TX lines of the Arduino but all the examples use the SoftwareSerial library to drive it using pins 8 and 9. A 1kΩ resistor is put in the Arduino (TX) to MP3 (RX) link to drop the voltage down from the Arduino’s 5V. That is pretty much all there is to it hardware wise for now.

The Code
As already mentioned, you need to load an MP3 or two onto the module and will have to do this using the built-in transfer application. There are full details of the process here. If you have an SD card version it is even easier as you can just load the MP3 files directly onto the SD card.
To talk to the module from an Arduino, you need to install the JQ6500 Serial library from this page. Download the JQ6500_Serial.zip file to your computer and then from within the Arduino environment do Sketch -> Include Library -> Add .ZIP Library and select your downloaded JQ6500_Serial.zip file.
Also as already mentioned the library uses the Arduino’s SoftwareSerial library to create a pseudo serial port on pins 8 and 9 which leaves the Arduino’s hardware serial port (pins 0 and 1) free for other uses.
The library contains several example sketches to try:
- Hello World – this is a simple “play a file over and over” demo to show everything is working.
- Full Demo – this provides a serial monitor driven MP3 player.
Here is the “help” from the full demo to give you an idea of what it can do.
JQ6500 MP3 Player Demo
~~~~~~~~~~~~~~~~~~~~~~~~~~~~~~~~~~~~~~~~~~~~~~~~~~~~~~~~~~~~~~~~~~~~~~~~~~~~~~~~~~~~~~~~~~~~~~
Status : Stopped
Volume (0-30) : 27
Equalizer : Normal
Loop Mode : Play one track then stop.

# of On Board Memory Files : 1
"Current" On Board Memory File Index: 1

# of SD Card Files : 0
# of SD Card Folders : 0
"Current" SD Card File Index: 0
"Current" SD Card File Name :

Controls (type in serial monitor and hit send):
~~~~~~~~~~~~~~~~~~~~~~~~~~~~~~~~~~~~~~~~~~~~~~~~~~~~~~~~~~~~~~~~~~~~~~~~~~~~~~~~~~~~~~~~~~~~~~
? Display this menu.

p Play > Next < Prev
[space] Pause r Restart from start of file
] Next folder [ Prev folder

f[1-65534] Play file by (FAT table) index number
F[01-99]/[001-999].mp3 Play [001-999].mp3 in folder [01-99]

+ Vol up - Vol down m Mute
v[0-30] Set volume

e[N/P/R/J/C/B] Equalizer (N)ormal, (P)op, (R)ock, (J)azz, (C)lassic, (B)ass
l[A/F/O/R/N] Loop (A)ll, (F)older, (O)ne, (R)???, (N)o Loop
s[S/B] Switch to (S)D Card/(B)uilt In Memory
Closing Thoughts
This is quite a nice little module – very self contained. The next step now is to hook this up to a MIDI interface and get some sounds triggering from MIDI notes. Once again this might benefit from having a simple shield holding it all together.
Kevin
