So, this is a stripboard version of the Arduino Multi MIDI Tone Module. Code and functionality is exactly the same, but I’ve built a “holder” for four Arduino Nano boards with common power, linked RX and TX, and built-in resistors for speakers.
Warning! I strongly recommend using an old or second hand keyboard for your MIDI experiments. I am not responsible for any damage to expensive instruments!
This is “part 2” of one of the beginner projects, but as this is mostly soldering, it isn’t really a beginner project itself unless you are very comfortable with soldering!
These are the key Arduino tutorials for the main concepts used in this project:
If you are new to Arduino, see the Getting Started pages.
Parts list
- 4x Arduino Nano
- 4x 8 ohm speaker (or old headphone speaker)
- 4x 220 resistor
- MIDI receive module (see Arduino MIDI Interfaces)
- Stripboard, headers, jumper wires, power
The Circuit

The basic idea is to use headers to allow me to plug-in four Arduino Nanos and they can take a common 5V and GND as power and will automatically have their TXs routed to the RX of the next one. They also have D2 pre-wired via a resistor to some headers to which I connect the speakers. You can see which pins of the Arduino will align with the board in the diagram – I added “dummy” header blocks over the image of the Arduinos as an indicator.
In the diagrams I’ve only shown headers for the pins that will be connected. In practice I’ve used a full 5-way female header block, but I pulled out the unwanted pins with a pair of pliers prior to soldering to ensure they don’t make an unwanted connection to the stripboard. This meant that one 5-pin header block only actually had 2 pins left, and the other 5-pin header block had 3.
As with all these circuits the stripboard is shown in fritzing with the copper strips on top, but the reality of course is that it will be a mirror image with the copper strips actually underneath.
Here is an image of the stripboard itself – in the original Fritzing orientation but also a “flipped” one that allows you to see where the header pins and cuts in the strips actually go.
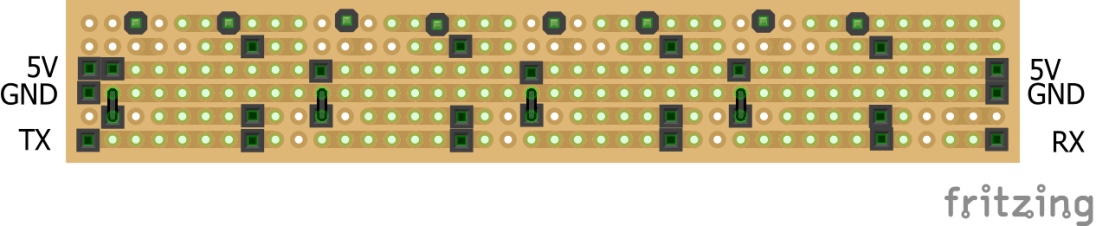

The “RX” input at the edge of the board is for the MIDI input from a MIDI receive module. Everything is powered from a 5V power supply, for example from a USB power “wall wart”.
Here is the finished board. Some of this soldering is particularly dodgy as at one point, whilst messing about getting one of the speaker headers aligned properly, I managed to overheat the tracks and lift the copper track right off the board… I had to bodge some extra structural rigidity by additional soldering to the “spare” outer track as there was no copper left where I needed it.


And wired up to Arduinos!


The Code
The code is exactly the same as for the Arduino Multi MIDI Tone Module.
Closing Thoughts
Apart from the dodgy soldering, I’m really pleased with how this turned out. It is a nice 4-note tone module. I do need to find four speakers the same though, or maybe use a simple additive mixer circuit to let me get away with one.
Kevin
